You use the Staff Tool to place staff brackets
(including “curly braces” on piano staves) into the document. Add brackets
to staves by grouping the staves. Drag the top or the bottom handles of
a bracket to stretch it, or to change its distance from the staves. To
create nested brackets (one bracket within another), group each set of
staves that you want the brackets to enclose. Staves can belong to more
than one group. You can also create “floating” brackets, unattached to
any staves and placed anywhere in the document, for certain modern pieces
that require them.
Note that Finale’s Setup Wizard automatically generates brackets
based on your staff selection. Brackets are also pre-defined in Finale’s
template files.
After a system has been optimized, edits
to groups and brackets only apply to that system. To edit groups and brackets
on optimized systems en mass, use the Update
Groups and Brackets plug-in.
To place a bracket on grouped staves
Finale allows you to define only one bracket
for each group you create. However, if you want to place more than one
bracket on a group, there’s an easy way to do so. See “To create additional (nested) brackets,
below.”
- Click the Staff Tool
 . The Staff Menu
appears.
. The Staff Menu
appears.
- If you haven’t yet created the group, do so
now. See Groups—To group staves.
- Click a group handle, then choose Edit Group
Attributes from the Staff Menu. Or, double-click a group handle.
(Or, choose Edit Group Attributes from the Staff Menu without selecting
a group.) The Group Attributes dialog box appears. To display the attributes
of another group, click the arrow controls to select another Group ID
number.
- Click one of the bracket styles in the Group
Attributes dialog box to select the style you want to use for the group.
- Specify the position of the bracket in relation
to the group. In the Distance from Left Edge of Staff text box,
enter the distance, in measurement units, that Finale should place the
bracket from the left edge of the staff. A negative number moves the bracket
to the left. Enter numbers into the Vertical Adjust (Top of Bracket) and
Vertical Adjust (Bottom of Bracket) text boxes for the distance to extend
the upper and lower ends of the bracket in relation to the top of the
top staff and the bottom of the bottom staff, respectively. To align the
bracket’s ends evenly with the top and bottom lines of the group, enter
a value of zero. A positive number for either option moves the bracket’s
end upward.
- Click OK to add the bracket and dismiss the
dialog box.
To
move or stretch a bracket
- Click the Staff Tool . Handles appear
on every group bracket in the document.
- Drag the bottom handle up or down. Drag the
top handle left, right, up, or down. When you drag the top handle
horizontally, the entire bracket moves. When you drag either handle vertically,
you can make it appear to enclose even non-grouped staves.
- Select a bracket handle and press clear
to revert a bracket to its default length (so it encloses the staves of
a group).
To correct
bracket display
In the course of creating a document, you
may have added or dragged staves between existing staves. Such changes
could have unexpected results, especially concerning the appearance of
your brackets. If a bracket doesn’t appear to be drawn correctly, you
can usually solve the problem with this technique.
- Click the Staff Tool . The Staff Menu
appears.
- Choose Sort Staves from the Staff Menu to restore
their appearance, based on the new staff order.
To
delete a bracket from a group
- Click the Staff Tool .
- To delete a bracket on-screen, click a bracket
handle, then press delete.
- Or, click a group handle, then choose Edit
Group Attributes from the Staff Menu. (Or, double-click a group
handle.) Or, choose Edit Group Attributes from the Staff Menu without
selecting a group. The Group Attributes dialog box appears. To display
the attributes of another group, click the spin controls to select another
Group ID number.
- Select None from the Bracket palette, then
click OK. Finale removes the bracket from the group.
To
create additional (nested) brackets
Finale allows you to define only one bracket
for each group using the Group Attributes dialog box. However, you can
still place more than one bracket on staves. Simply create additional
groups for the same staves, choosing a different bracket style for each
group. This has the advantage that each bracket is automatically sized
to match its corresponding group.
Create a
new group that contains the staves that you want the bracket to enclose,
then choose a bracket for the new group. See “To place a bracket on grouped staves”
earlier in this section.
To
modify brackets on a system-by-system basis
You can avoid showing a bracket on a group
containing a single staff, such as a solo line. If you don’t want a bracket
to appear, make sure that Show Bracket If Group Only Contains One Staff
is not selected in the Group Attributes dialog box.
However, there may be situations where
you need the bracket configuration to change from one staff system to
another. If you optimize the system (remove any empty staves), you’ll
find that you can use the Staff Tool in Page View to rearrange and re-bracket
the staves on a system-by-system basis. For details on staff optimization,
see Optimizing
systems.
- Choose Page View from the View Menu.
Two handles appear on staves that have been optimized.
- Drag to adjust the bracket for the staff system.
Or, double-click the group handle for that staff system that you want
to change, change the bracket as needed, then click OK. (For instructions,
see Groups—To group staves, and “To place a bracket
on grouped staves,” above). Any changes you make will appear only
in the single, optimized, staff system.
After a system has been optimized, edits
to groups and brackets only apply to that system. To edit groups and brackets
on optimized systems en mass, use the Update
Groups and Brackets plug-in.
To create
“floating” brackets
A “floating” bracket is unattached to any
particular staff; it can appear anywhere on the page. Finale considers
such a bracket purely graphic, you can use the Expression Tool to place
it.
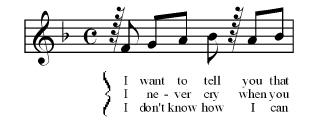
Floating brackets can be especially useful
when you need to enclose a group of lyric verses, as shown:
- Click the Expression Tool
 .
.
- Double-click on, above, or below the note to
which you want to attach the bracket. The Expression Selection
dialog box appears.
- Click Create, and then select the Shape radio button.
- Click Create. You arrive at the Shape
Designer dialog box.
- Choose Bracket Style from the Shape Designer
Menu, and double-click the bracket style you want.
- Click the Bracket Tool
 , and then click in the drawing area. A bracket appears.
To adjust its height or width, click the Selection (arrow) Tool, click
the bracket, and drag its bounding handles.
, and then click in the drawing area. A bracket appears.
To adjust its height or width, click the Selection (arrow) Tool, click
the bracket, and drag its bounding handles.
- Click OK, OK, Assign to return to the score.
You can stretch or move the bracket as needed
(see below).
To
move, stretch, or delete a floating bracket
- To move or delete the bracket, click the Expression
tool. Click the note or measure to which the bracket is attached.
Its handle appears.
- Drag the handle to move the entire bracket.
Click the handle and press delete to remove it. To stretch the
bracket, double-click the handle, and drag one of the eight bounding handles
that appear. To completely reshape the bracket, double-click it a second
time, and drag its individual control-point handles.
