Digital Performer vs. 7/Virtual Instrument Project
If you spot any typos or find any part of this tutorial hard to understand,
please send an email report to jnewton@pdx.edu
You have been asked to create a horn arrangement of a jazz standard:
1) Using the provided DP file and sheet music, sketch an arrangement for sax quartet
2) Input the new parts as MIDI data in the DP file
3) Instantiate a Virtual Instrument (VI) and assign MIDI tracks to it
4) Create a mix using MIDI mixing board
5) Create a stereo audio track and record your MIDI data as audio
6) Export your music mix to a standard audio format
Part 1: Sketch an Arrangement
•From the link at the top of the page, download the Jazz Arrangement project files.
The link will download a compressed file which should open on your desktop into a folder called JazzArrangement.
•Rename the folder Lastname.Firstname.JazzArrangement (using your last and first names) and store it in an appropriate place on your computer.
We will discuss file management issues, including file storage and backup, in class.
•Open the folder and find the file a_train_rhythm.perf. Open the file in Digital Performer vs. 7 by dragging its icon over the DP icon in the Dock.
If you want to work in a different sequencing application, the folder also contains a Standard MIDI File version of the project (a_train_rhythm.mid).
•Play through the sequence and make sure you can hear the parts.
The MIDI tracks are assigned to the Apple DLS Softsynth, on a track named DLS. This sound module is a General MIDI sound set stored on the computer.
The patches are set with MIDI events in each track as follows:
- Soprano Sax: 065 Soprano Sax
- Alto Sax: 066 Alto Sax
- Tenor Sax: 067 Tenor Sax
- Baritone Sax: 068 Baritone Sax
- Piano: 002 Bright Acoustic Piano
- Bass: 033 Acoustic Bass
- Ride: 001 Standard Kit
You are welcome to change patches if you like but make sure you change them there, not in the Default Patches column.
•The sequence contains a full rhythm section, plus the melody line played on Soprano sax. Notice there are empty tracks assigned to Alto, Tenor, and Baritone saxes.
•In your project folder, find the file a_train_mel_staves.pdf. Double click it to open it in a PDF reader on your computer.
The score has the melody line along with chord symbols in the top staff. Notice that the staves below are blank.
This will be passed out in printed form in class. Please don't use the MIDI Lab printer to print additional copies unless necessary.
•In your project folder, find a_train_audio.mp3 and drag it to the Quicktime icon in your Dock to open it in Quicktime.
•Using the sheet music and audio file, and referring to the DP sequence, sketch a horn arrangement of this 32-bar tune.
You can do this in several ways. If your arrangement consists of block chords sharing the same rhythm, you could write the whole part out on a single staff. Or you could write individual parts out on separate staff lines, especially if the parts do not share the same rhythm. Give some thought to the ranges of the instruments, too. Different parts of the tune might be done in different ways. You could use the additional blank staves to try out different things, to write down bass or chord notes, or to add additional parts.
•The assignment calls for an arrangement for sax quartet. You are welcome to customize your arrangement if you wanted to use a different instrument group. You can also change the existing parts if you choose.
Part 2: Input New Parts
--SET DIGITAL PERFORMER PREFERENCES
•Reset the preferences for this file according to these instructions.
--CREATE MIDI TRACKS OF YOUR ARRANGEMENT
•In the Digital Performer file, using your handwritten score, input parts for the three blank sax parts.
You may also customize the arrangement if you choose, including additional parts, or changing existing parts.
Part 3: Instantiate a Virtual Instrument
--SET LEVELS ON YOUR VIRTUAL INSTRUMENT TRACK
•Go Project > Mixing Board to open the Mixer.
If you are using the Consolidated Window, you may need to "pop" the Mixing Board out of the Consolidated Window. If this is unfamiliar, make sure you have standardized your Digital Performer preferences.
•In the Mixing board, use the Track Select column to select just the DLSMusicDevice channel strip.
If the Track Select column is not showing on the left, click the small Show/Hide Track Selector button in the lower left-hand corner of the Mixer window.
In the Track Select column, option-clicking a track name will show just that track in the adjacent window.
In the DLSMusicDevice channel strip, notice that the DLSMusicDevice appears in the top plug-in slot.
Basically, an Instrument track is like an Aux track with a software instrument inserted as a plug-in.
If you need to re-access the control window for a particular VI, double click the DLSMusicDevice name in the plug-in slot.
•Play your track, and confirm you are monitoring the DLS Virtual Instrument.
In the DLS channelstrip, watch the meters. This is the overall level that this VI is outputting.
•Insert a Trim plug-in in the second plug-in slot of the DLSMusicDevice channel strip.
For now, you can leave the level in the Trim window at 0. You can change this later if you want a louder or softer level from the DLS VI.
Part 4: Create a Mix
--SET UP FOR A MIDI MIX
•In the Mixing Board window, use the Track Select column to select (and show) all MIDI tracks.
Notice that some preliminary levels have been set for the various tracks. You might play through the tune and see how you like the various levels.
Notice that the levels for the drums tracks are not the same. Because these tracks share a MIDI channel, they need to be made uniform.
•Set a MIDI Volume of 90 for each of the drum tracks. Also make sure they are all panned to the center.
•Set some general levels for your tracks so that things are basically in balance. Also, make some decisions on panning, and pan your tracks accordingly.
Do not pan drum tracks.
--MIX YOUR TRACKS
•With general levels set, now create a final MIDI mix of your project.
•You might incoroporate level changes into your MIDI tracks using MIDI volume automation.
Generally, you would do this by "arming" a track in the Mixing window for automation record. Notice that this also turns on the green play automation button. Then you would make changes during playback of a track which would be recorded as MIDI volume events (see below).

You can also edit MIDI volume events in the Graphic Editor window.
|
Under the Hood: MIDI Volume Automation
How does this work exactly? What is being "automated" when we record the fader moves, and where is that information stored? This type of automation makes use of what's called a MIDI control message. Just like MIDI notes send data to a sound module telling it to trigger or stop a sound, a control message tells all sounds on one particular MIDI channel to change in some way depending on which control message is being sent. There are many possible MIDI control messages, including ones that control volume and pan. The message that controls volume is MIDI control message number 7. So, in Digital Performer, if you open a tracks event list, and click on the "I" button in its menu bar, you can insert a single control message that will effect how all data on that track's channel from that point forward.
One thing, though--in DP, the message will only have effect if the track has its atuomation enabled. You can enable a track's automation in the Tracks window in a track's ATO column, or in the Mixing Board as described above. When you "record" automation by moving the fader in the Mixing Board, you are actually placing many MIDI control #7 messages into the designated track. After you've recorded, open that track in its Event List, and notice that there's a lot of those messages now in place. Each of them changes the volume of the track as it is triggered. Sometimes, if you have an underpowered computer or if there is a great deal of MIDI control information being processed, automation data like this can challenge your system. Use it judiciously! |
Part 5: Record an Audio Mix
--CREATE A STEREO AUDIO TRACK:
Now we want to record our mix. In other words, we want to create a new audio file that sounds like the MIDI mix we have made.
To record audio, first we need to add a track that will represent the new audio file. Since we are making a stereo mix, we will add a "stereo audio" track.
When you add a track, it will be placed below any selected track. Since we want to add this track to the bottom of our list, first make sure no other track is currently selected.
•To add a Stereo Audio track to your mix, go Project > Add Track > Stereo Audio Track. A new track will be added to the bottom of your Tracks window.
•Option-click the new track name, and rename the track A Train Mix. Make sure its output is set to Built-In Audio 1-2, the headphone output of your Mac.
--CREATE A BUS
Now we need to set the new audio track so that it can receive an audio signal. To do this, we use an audio routing utility called a "bus." A bus is capable of receiving and sending audio, and is used to help route audio between tracks.
In DP we assign buses in the Bundles window.
•To create a new audio bus, go Studio > Bundles to open the Bundles window.
•In the Bundles window, click the Busses button at the top of the window to open the Bus assignment screen.
Notice the potential bus assignment slots at the top right of the window.
If any busses are currently assigned, select them and hit the Delete key to remove them.
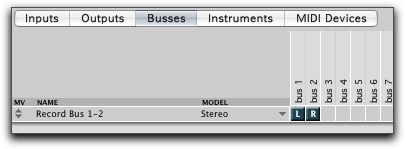
•To add a bus, hit the Add button at the lower left of the window. A new bus is created. Make sure the bus is Stereo (you can change this in the Model column), and that it is assigned to bus slots 1 and 2.
•Option-click the name of your bus, and rename it Record Bus 1-2.
Your bus assignment should look like this--

•When you are finished, close the Bundles window.
--USE THE BUS TO ROUTE AUDIO TO THE MIX TRACK AND SET UP TO RECORD
We've created a bus, now how do we use it to route audio so we can record our mix?
Recall that the bus can both receive and send audio. We want it to receive audio from the MIDI tracks, and we want it to send audio to our new stereo mix track. Here's how we set that up.
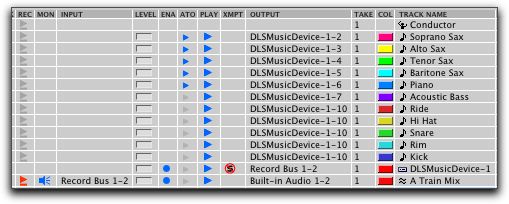
•To route audio for our mix, return to the Tracks window. Access the menu in the Output column for the DLSMusicDevice-1 track, and select Record Bus 1-2.
•Now access the menu in the Input column for the A Train Mix track, and select Record Bus 1-2.
•To get ready to make your recording, "arm" the A Train Mix track by clicking on the button in its REC column. The record button turns red, which shows that this track is ready to record audio.
•So you can hear your mix when you record, hit the small blue speaker button in the MON column of the A Train Mix track.
If you hit Play at this point, you may not hear your mix--the DLS track is being sent to a bus, and unless you are actually recording, no audio is passed to the headphone output. To remedy this, go Setup > Configure Audio System > Input Monitoring Mode to open the Input Monitoring Mode window. Here, select "Monitor record-enable tracks through effects" and hit OK. Now you will hear your tracks play even if you are not actually recording. After you make your recording, turn off the blue MON button to hear your recording play back.
Your recording setup should look like this:

--RECORD AN AUDIO MIX
At this point we are ready to record audio. You might do a final playback to make sure your MIDI tracks sound the way you want them.
If we relocate to the beginning of the sequence and hit Record, we will get a recording, but it will include two measures of silence. We will use Auto Record to limit the amount of audio that is actually recorded.
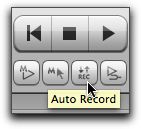
•In the Transport window, hit the Auto Record button to turn it on.

•Below the Auto Record button, find the boxes to the right of Punch-In, and enter this location: 0/4/360.
Notice that the red Auto Record start locator moves to this location in the Tracks window.
We want a start point just slightly before the start point of our music.
•Now in the Punch Out boxes, enter 37/1/000. The Auto Record end locator moves to this position.
We want an end point that allows for reverb "ring-out." If for any reason you made your song longer, adjust your end-point accordingly.
•On the number pad, hit 1 to relocate the transport to the start of the sequence.
•Important: turn off the blue MON button in the A Train Mix row to turn play-thru off if you previously turned it on.
•In the transport window, hit the Record button.
Playback will begin. At the punch-in point, a recording will begin.
•When playback passes the recording end-point, stop the transport, then hit number-pad 1 to relocate to the beginning of your sequence.
•To listen to the recording you made, click once on the new recording in the tracks window to select it (it will turn yellow), then hit Option-Spacebar to play it.
Option-Spacebar plays whatever is currently selected.
If you reset your monitoring options as described above, you may need to first turn off the blue MON button for your mix track.
•If you do not like your mix for any reason, go Edit > Undo Record to undo the recording and remove it from your track. Then make any necessary changes, and repeat the steps above.
•When you have a recording you like, save your file and proceed.
--EXPORTING IN DIGITAL PERFORMER:
Our next step involves creating two audio files that have formats appropriate to burning a CD and posting a file to the Internet (see Under the Hood: Audio File Formats below).
To do this in DP, we need to "export" our mix in the appropriate formats.
•Using these Exporting in DP instructions, export both an AIFF and an MP3 version of your piece. Store them in your project folder somewhere.
You will use the AIFF file later to burn an audio CD of your mix. After your project folder is turned in, your arrangement will be posted to the Student Arrangements page along with other student work.
|
Under the Hood: Audio File Formats
When you record MIDI using a sequencer like Digital Performer, you are recording data directly into a Digital Performer file. When you record audio using a digital audio editor (again like Digital Performer), the recording is placed into a separate file on your hard drive. Digital Performer by default puts any audio files it has recorded into a folder called Audio Files in side whatever folder contains the recording file. Audio files are not all alike. They can be "full-sized" or "compressed" and they can be in one of several "formats." There are two main formats of "full-sized" audio. A format called Wave was originally created to be compatible with Windows OS, and the other format, AIFF, was created for use with Apple computers. Nowadays, either format may be used on any platform, tho when we work on Macs, we typically use AIFF format. Computers use "extensions" to help identify file types--these are the 3 or 4 letters that follow the period at the end of some file names. AIFF audio files carry either .aif or .aiff extensions, and Wave files use a .wav extension. Full-size audio formats are big--a one-minute stereo AIFF or Wave file is 10 MB in size. There are times when we want audio files that are much smaller--for example, when using audio on the Internet. Engineers have developed methods of "compressing" the data size in audio files, the most common being what's known as the MP3 format. MP3 files carry the extension .mp3, and are about 1/10 the size of full-size audio. In short--to burn CD's we use full-size audio like AIFF. To post files to the Internet we use a compressed format like MP3. Digital Performer doesn't use any of these audio file formats, so when you record or import audio into DP, audio files are reformatted into a full-size format called Sound Designer II. To obtain files in AIFF or MP3 format, you need to "export" the files--basically this means the files are copied, given the new format, and, in the case of MP3, compressed. |