 Notice the following about the variable names. First, variable names
must be no longer than 8 characters (alphabet plus arabic numerals)
This is a requirement for SPSS and many other data analysis programs.
Some programs allow longer names.
Notice the following about the variable names. First, variable names
must be no longer than 8 characters (alphabet plus arabic numerals)
This is a requirement for SPSS and many other data analysis programs.
Some programs allow longer names. The first step is to prepare a codebook - a complete list of all your data, showing the name of each variable, the values the variable takes, and a complete description of how that variable is operationalized. For questionnaire data, the simplest way to prepare a codebook is to make a copy of your questionnaire, write variable names in the margins, and enter numeric codes in each response category blank. Later, you will need to add statistical information: distribution of observations among all the values that may be taken by each variable, and mean, sd, and range for the interval and ratio variables. If you combine variables to create new variables, you will need to add a section for each new variable in which you describe how the variable was combined, and give the mean, sd, and range for the composite variable. This codebook is vital to you as you interpret your data - it is what keeps you from getting lost in a sea of numbers.
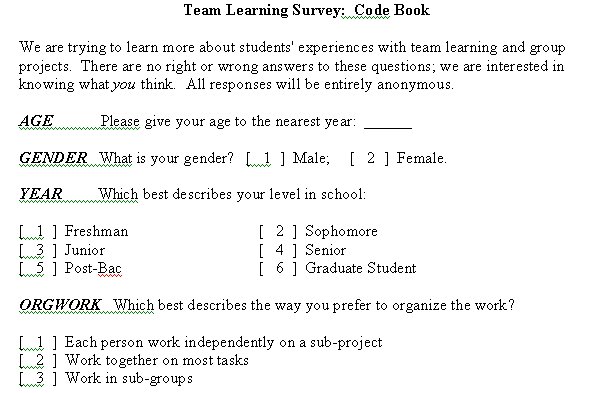
Take a look at part of the codebook I created for the group project study:
Notice the following about the variable names. First, variable names
must be no longer than 8 characters (alphabet plus arabic numerals)
This is a requirement for SPSS and many other data analysis programs.
Some programs allow longer names.
Also notice that I have named each variable mnemonically - the variable name tells me something about the nature of the variable. That is especially important in larger data sets, if you have more than a half dozen variables to keep track of.
I will show you how to do data entry using SPSS's interactive features.
It is actually much faster to do data entry by creating a raw data file
and creating a separate data capture command file - but to do that, you
need to know something about programming in SPSS. The nice thing
about the interactive features is that you need know no command language
at all; the interactive program does it all for you.  (Note: If you would like to learn how to write your own data capture
programs, you can get a manual for SPSS at Powell's Technical Books.)
(Note: If you would like to learn how to write your own data capture
programs, you can get a manual for SPSS at Powell's Technical Books.)
You can get a student version of SPSS fairly cheaply - I think it is less than $60. It will not allow you to use command language or other higher-power shortcuts, but it should suffice for everything you need as an undergraduate - unless you really get interested in statistics.
 In
SPSS, the first step in data entry is to set up your data file. To
open SPSS, click on the SPSS logo. If you don't see the logo on the desk-top,
click on "Start," then on "Programs." Most of the computers
on campus have SPSS, but only a few have it on the desk-top.
In
SPSS, the first step in data entry is to set up your data file. To
open SPSS, click on the SPSS logo. If you don't see the logo on the desk-top,
click on "Start," then on "Programs." Most of the computers
on campus have SPSS, but only a few have it on the desk-top.
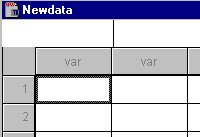
The first screen that comes up is the Data Entry Worksheet (a small corner is shown at the left). You will notice across the top a row of boxes with "Var" in them. These are for the variable names.
To enter your own variable names, start with the first of these boxes,
and double click on "var." A variable definition screen
will come up. Enter the variable name (8 characters or less, from your
codebook) in the box. Notice the buttons underneath "Variable Description."
Click on "Type..." to change the variable type. In most cases,
leave it on the default, numeric. 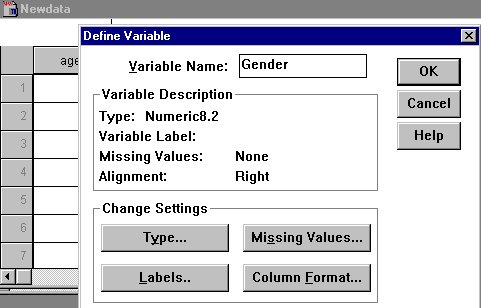 However,
if your variable is nominal or ordinal, or if it will be rounded to whole
numbers, you may want to change the decimal places setting to zero.
However,
if your variable is nominal or ordinal, or if it will be rounded to whole
numbers, you may want to change the decimal places setting to zero.
It is also often useful to define a particular value - well outside the range of possible values - as a "Missing Value." Analysts often use "9" or "99" to mark missing values. If you have done that, be sure to specify the missing values (in the window that opens up when you click on "Missing Values...").
Finally, it is a good idea to assign labels to the variable and to each value (for nominal and sometimes for ordinal variables) to help you when you are interpreting your data. The "Labels" button will bring up a screen that allows you to do this. "Gender" is fairly obvious; nonetheless, I have entered "Male or Female" as a variable label. Every time I conduct an analysis using this variable, the output will include my label, to remind me what the variable is all about.
 For
values, however, it is not necessarily obvious what numbers to assign to
each gender.
For
values, however, it is not necessarily obvious what numbers to assign to
each gender.
I always assign 1 to male and 2 to female - as a mnemonic device, since sex is determined by the number of X chromosomes. So I enter "1" in "value," and "Male" in "Value Label," then click on "Add." Next I will enter "2" in "value" and "Female" in "Value Label," click on "Add," and I will be done. Click on "Continue," and the "Define Labels" window will close.
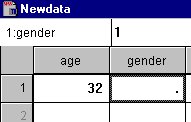
If I don't want to make any more adjustments to my labels, I will click on "OK." The "Define Variable" window will close, and after a moment the new variable name will appear on the input screen.
 Continue
in this fashion until you have entered all your variable names with appropriate
value labels, etc.
Continue
in this fashion until you have entered all your variable names with appropriate
value labels, etc.
A note about categorical questions. Sometimes we ask a question for which more than one answer is possible. In that case, we need to allow respondents to choose more than one.
The problem is obvious: You can enter only one value for each variable!
What to do? Assign a separate variable name to each response, and code
it "1" for "Marked this response" or "0"
for "Did not mark this response." (Note: An alternative is to
use a Likert-type scale to allow subjects to indicate degree of agreement
- but sometimes we want to force an all-or-nothing response.)
 For example, if you ask, "At one time or another, have you ever experienced
the following emotions in a group project?" and you include the following
responses, "Aggravation," "Friendship," and "Inspiration,"
you actually have three variables. You might name them something like "GPAGGR,"
"GPFRND," and "GPINSP."
For example, if you ask, "At one time or another, have you ever experienced
the following emotions in a group project?" and you include the following
responses, "Aggravation," "Friendship," and "Inspiration,"
you actually have three variables. You might name them something like "GPAGGR,"
"GPFRND," and "GPINSP."
Now you are ready to enter your data. The easiest way is for one person to enter the numbers while another person reads them off. Use the arrow keys to move across the screen after you have entered each variable; when you have finished with one subject, you will need to arrow clear back to the beginning of the next row.
Save your data!
It is a good idea to save your data file every so often - a computer crash just before you finish, after you have already entered 100 cases, could drive you to drink - or worse! To save, click on the "File" button, then on "Save As." Another window will open, giving you various options, starting with naming your file. I suggest giving your file a mnemonic name - again, it must be 8 characters or less. I named my data set "Groups," then when I saved a subset, named that "Groups2." The computer will assign a file type ".sav" to recognize it as a data file. Be sure to change the directory to A unless you are working on your own computer!
Communication Studies
Mainpage
![]() (PSU
Home Page)
(PSU
Home Page)
This page is maintained by David Ritchie, e-mail:
cgrd@odin.cc.pdx.edu
Last updated on July 29, 1999.