 Note that the arrow turns around until you click on another variable in
the box to the left: You can use this arrow to move variables either in
or out.
Note that the arrow turns around until you click on another variable in
the box to the left: You can use this arrow to move variables either in
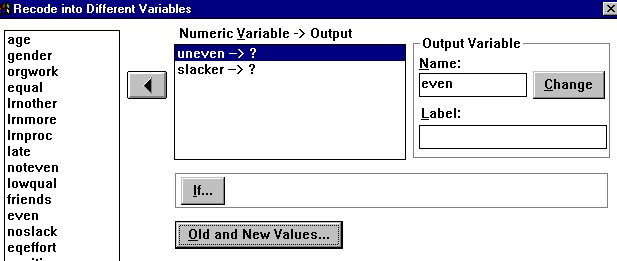
or out. To recode the variables, click on "Transform," then "Recode," then "Into Different Variables." If you select "Into Same Variables," the new values will over-write the old values and you will lose data that you may want for some other reason.
Block the variables you want, either one at a time or as a group, and
click on the arrow to move them into the Numeric Variable -> output
box.
Note that the arrow turns around until you click on another variable in
the box to the left: You can use this arrow to move variables either in
or out.
To set up the actual recoding operation, click on one variable name,
then enter the new name under "Name:" I chose "even,"
which is the opposite of "uneven." I did not enter a label this
time, but it might be a good idea to include a label such as "recoded
value of UNEVEN." The "If..." button allows you to do conditional
recoding - for example, you might want to create a new variable just for
men, or just for Freshmen. 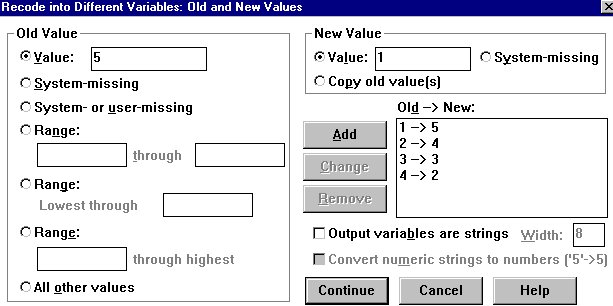 I
I will ignore this button, because I want to create a new variable for
all my subjects. I click on "Old and New Values..." to enter
the actual recoding instructions. When the "Old and New Values"
window comes up, you have several options. The simplest is to proceed,
one by one, by entering the old value in the first box under "Old
Value," the new value under "New Value," then click on "Add."
As you can see, in this screen I have already moved through the entire
range of values, and am ready to add the final value. You can shorten the
process by simply typing the recoding instructions directly into the "Old
-> New": box.
I
I will ignore this button, because I want to create a new variable for
all my subjects. I click on "Old and New Values..." to enter
the actual recoding instructions. When the "Old and New Values"
window comes up, you have several options. The simplest is to proceed,
one by one, by entering the old value in the first box under "Old
Value," the new value under "New Value," then click on "Add."
As you can see, in this screen I have already moved through the entire
range of values, and am ready to add the final value. You can shorten the
process by simply typing the recoding instructions directly into the "Old
-> New": box.
You can also use this box to recode an entire range of values into a single value. For example, if most of your sample consists of Communication and Business majors, but you have a few students from several different majors, you might want to recode all the other majors into a single category, "other." If Communication = 1, Business = 2, Science = 3, Art = 4, and Engineering = 5, for example, you could check "Range:" and enter 3 through 5 in "Old Value" and "3" in "New Value," to recode all of the others at once. Or, you could simply enter three separate recode commands.
An important point: If you are recoding into a new variable, be sure to include all values of the old variable. An easy way to be sure you don't leave out any variables is to check the box, "Copy old values," then edit the values to get the recoding you want.
Now you are ready to create your new variable by averaging the values of the three related variables to create an Index. Click on "Transform" then "Compute," and the screen at the left will come up. Enter the name of the new variable you want to create in the box under "Target Variable." Then enter the formula for the new variable under "Numeric Expression."
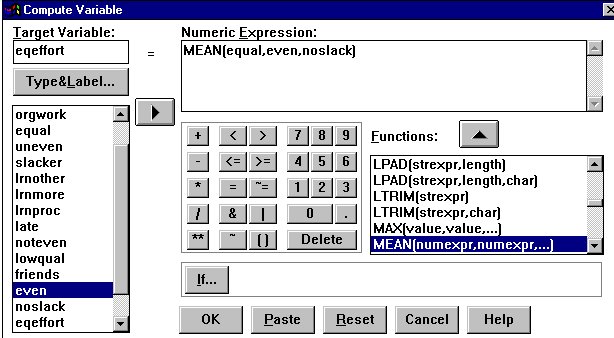
Since SPSS has a particular syntax, you may find it easiest to search through the list of "Functions." If you aren't certain about a given function, click on the "Help" button.
The function you are most likely to use is MEAN. Click on "MEAN" then click on the arrow to copy the function into the box. Now, replace each "numexpr" with one of your variable names. You can include as many variable names as you want; just be sure to put commas between them.
Again, notice that you can use the "If..." button to compute the new variable only for cases that meet certain criteria. Until you have done several data analyses, you will probably want to ignore this possibility! When the expression is complete, click on "OK," and the new variable will be calculated for every case in your data set.
Continue on to Comparing Means (ANOVA)
Return to:
Communication Studies
Mainpage
![]() (PSU
Home Page)
(PSU
Home Page)
This page is maintained by David Ritchie, e-mail:
cgrd@odin.cc.pdx.edu
Last updated on July 29, 1999.