SAMP Studio Recording Project Setup
Setting Up a Voice Record Project in the SAMP Lab
top instructions
desc
In the SAMP Studio, you intend to:
- Power on and set up hardware
- Connect the mic signal from the booth mic(s) to the control room
- Create a new recording project in Studio One (or use a template)
- Receive the mic(s) signal in the Studio One project
- Play the signal from the Studio One project in the control room
- Allow the voice talent to hear themselves speak
- Be able to communicate with the voice talent
- Record multiple takes of the voice talent
- Save and archive your project
s1
Before trying the record, take the time to turn everything on, set up hardware, and test things.
In the Control Room, power on the following--
- Macintosh Computer, the round silver tower to the right of the desk, power in back. It is likely already on, just hit a key on the keyboard to see. To log in to the student account, use the password student.
- The Drawmer speaker control on the desk to the right. This device allows you to choose a speaker set and control sound pressure level in the control room.
- The speakers themselves. The power buttons are on the rear of the cabinets.
- The MOTU 1248 embedded in the bay on the right, power button on the right. This device is the main audio interface for the studio, the central connection between the booth (and other rooms) and the control room.
In the Booth, power on the following--
- The lights. The switches are above on the back wall. You may need a flashlight for this step.
- The small powered speaker. This is used as a talk back monitor.
- The power strip at the base of the rack. This will power on the three devices in the rack--
- ART P16, a simple XLR patchbay connected directly to the 8M inputs 1-8
- MOTU 8M, a set of mic-inputs and pre-amps equipped to send and receive AVB signal
- Behringer headphone amp
In the Booth, connect the following hardware--
- Headphones for each talent, plugged into the Behringer
- XLR cables, plugged into input 1 (or 1 and 2) of the ART (which connects to the 8M equivalent input)
- One or more microphones, connected to the appropriate XLR cables
- Mic stand as needed
- You may also want to set up a music stand and stand light if needed
Note: don't change controls on the 8M manually at this point. For example, don't engage phantom power manually on the 8M.
s2
So now we want to get the signal from the mics to the control room so we can record their signal in Studio One (or any DAW).
The mics are connected to inputs 1-2 of the ART. The ART is simply a passive (unpowered) patchbay connected directly to the MOTU 8m.
So, effectively, we've plugged the mics into inputs 1 & 2 of the 8M.
Mics have to be first run thru a pre-amplifier. The 8M inputs provide the preamps for the mic inputs.
To convert an analog signal to digital data requires analog to digital conversion (ADC). This also is done by the 8M.
So now we want to send a digital signal of the mic information from the 8M to the control room.
The 8M is connected via Ethernet cable to the 1248 in the control room. They communicate via a protocol called Audio Video Bridging (AVB). This protocol allows streaming of digital audio both ways between the two devices. For our purposes, the 8M is sending 8 channels of digital audio to the 1248. This includes signals from the 2 mics.
In the control room, the 1248 is connected to the Mac via USB cable (USB 3.0).
The clearing house for the whole process is the 1248. Let's open the software that controls this process.
•On the Mac, click the icon for the MOTU Discovery widget in the upper right corner of the menu bar.
![]()
You will see the MOTU Devices connected via AVB to the Mac.
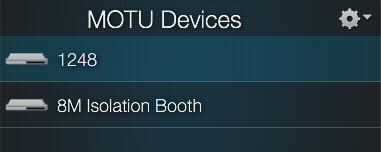
If you don't see this list, make sure both devices are powered.
•Select 1248 to open the MOTU AVB Control web app.
You can get good info on this app in the MOTU 1248 manual starting on page 17.
The MOTU AVB Control web app window is a bit daunting, so let's break it down.
First, notice that this window is open in Safari, a web browser. So you can scroll and zoom it, and tab it with other browser windows like this tutorial.
On the upper left-hand side, notice the four aspects of the device you can control.
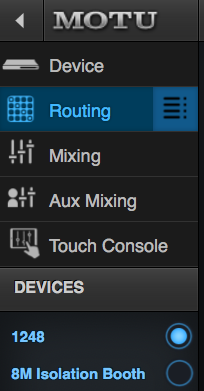
Below that, notice that you can switch devices.
•Under the Devices tab, click the 1248 button to make it the selected device as shown in the picture above.
•In the upper left-hand corner of the MOTU AVB Control web app window, click Device.
In the resulting window, what you see is a graphic representation of the physical connections, in and out, of the 1248 itself. You can compare the the physical controls on the actual device if you like. You might also look at page 18-19 of the manual (link at the top of the page).
•Now Click Routing.
Whoa.
It's in this view we make connections among all available hardware and software inputs and outputs (see page 20 of the manual).
This is complex, but for our purposes, in brief, we want to make four connections:
1) bring audio from the microphones from the 8M to the computer (via the 1248) and then into our Studio One tracks
2) send audio from the computer (the output of the Studio One tracks) to the speakers in the studio (via the Drawmer MC2.1 Monitor Controller)
3) send audio from the computer (the output of the Studio One tracks) to the voice talent headphones (via the Behringer Powerplay headphone amp)
4) send talkback audio to the Roland MA-12 speaker in the booth
AVB & USB
AVB STREAMING
Before we make connections, let's understand how the AVB communicates.
It has one or more "streams" of digital audio, each of which carries 8 signals each way.
In the matrix we can see this as AVB stream <stream number><channel number>.
We are only dealing with the first stream of 8 I/O, which we see expressed this way as Outputs in the matrix—
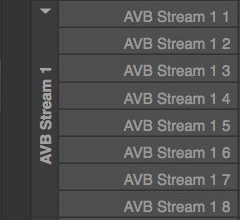
In other words, this represents 8 streaming channels that can be sent from the 1248 output to the 8 M.
Now look at the top at Inputs.
The section called 8M Isolation Booth:1 and the labels below have been been renamed. The original names of the inputs were 1 1, 1 2, and so forth. The renaming identifies their use. In other words, this says "outputs from the 8 streaming channels of the 8M, which can accept mic inputs, can be connected to inputs of the 1248."
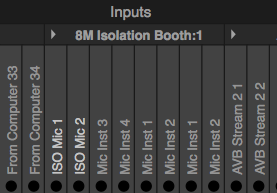
We have mics plugged into inputs 1 & 2, so we would connect to the inputs labeled ISO Mic1 and ISO Mic2.
USB CONNECTION
Recall that the 1248 is connected to the computer via USB.
This connection opens 32 virtual digital channels to and from the computer. Similar to the AVB connections, these connections go both to and from the computer.
If you like, look in Audio MIDI Setup App audio window. In that app you can see how audio and MIDI devices are connected to the Mac.
This app is in the Utilities folder inside the Applications folder.
In its Window Menu, choose Show Audio Devices, then click 1248 in the left panel to see the following pic--

So, in summary, the 1248 is connected to both the 8M and the computer, both input and output, and these connections show up in the Matrix window.
So returning to our first goal, we want to bring audio from the microphones from the 8M to the computer (via the 1248) and then into our Studio One tracks.
We'll do the Studio One part in a moment, but first we want to connect from the 8M inputs 1-2 (which we have seen are labeled 8M Isolation Booth:1) along the top, to the Computer input 1-2.
We do this by adding highlighted connection boxes to the matrix.
•In the Matix, hightlight the connection boxes to make the connections from ISO Mic 1 and ISO Mic 2 to To Computer 1 & 2 like so--
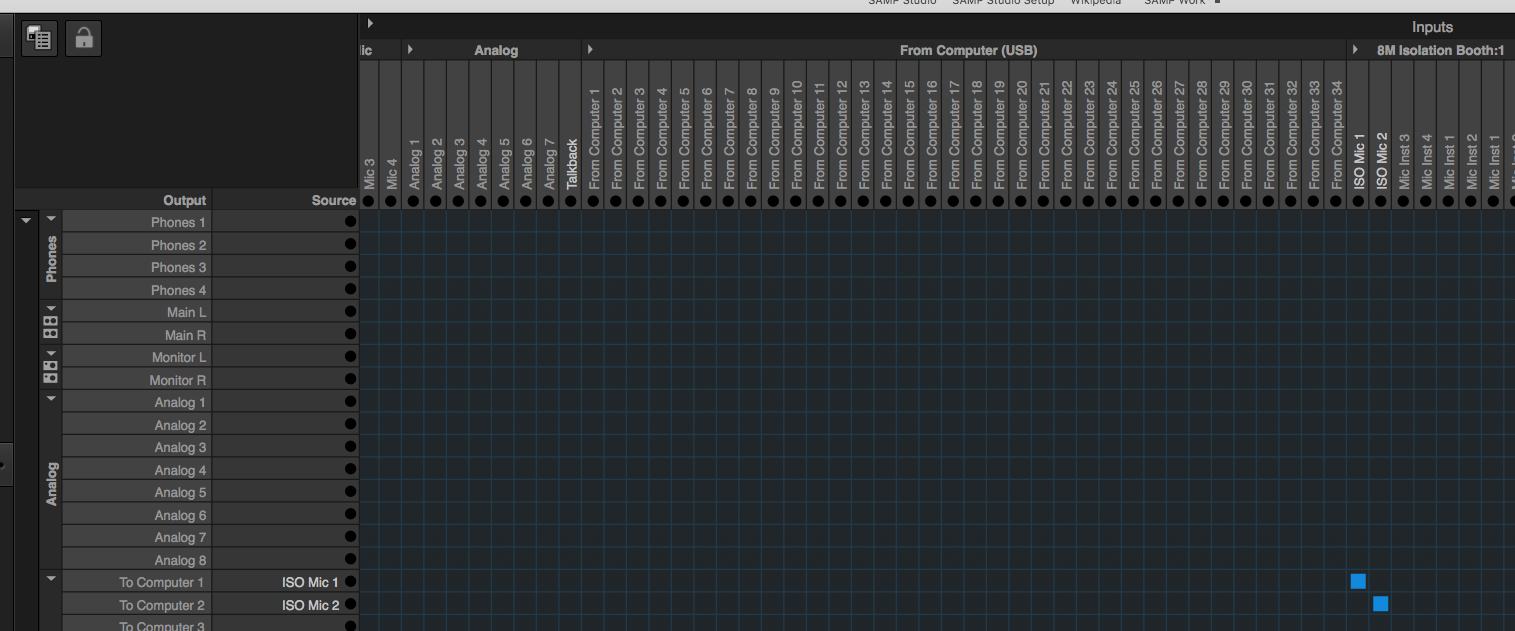
In other words, we're connecting inputs 1-2 of the the AVB stream 1 coming from the 8 M (the mics signal) to the Computer virtual channels 1-2 coming from the 1248.
When this connection is made, the Matrix shows the specific connection in the Output Source column.

Before we do something with that audio, there's one more thing to take care of.
Question: do your mics need phantom power? If not, skip ahead. But if they do, we can manage that from the MOTU App.
•In the MOTU app, click Device in the upper left corner, then select the 8M.
You should see the 8M Mic inputs graphically. Here you can apply phantom power, also toggle a Pad, set input levels on the mics, and other settings.
•Turn on phantom power (48V) for the mics you are using.

So now that we have audio coming to the computer, let's put it to use.
s3
Back at the Mac, let's create a working DAW file.
•Open Studio One Pro 4.
There should be an icon in the Dock you can click, if not find it in the Applications folder.
It will take a few seconds to load. If you get a dialogue, just say no.
•In the upper left corner, click Create a new Song.
•In the resulting New Song window, select Empty Song.
•In the Song Title box, type a unique title for your song.
•Just below the Song Title box, click the path button to set a location for your project.
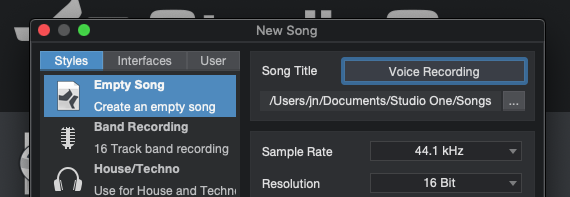
Be careful here: Studio One will enter a default song name and location unless you make changes. You should change these to keep track of your files.
Take note of the Sample Rate and Resolution. Defaults are usually OK, but they will default to the last user's settings.
•Click OK.
A new song file will open.
Now we want to connect the file to the MOTU 1248 for both audio input and output.
•Access the Studio One menu and select Preferences (i.e. Studio One > Preferences) to open the Preferences window.
•In the Preferences window, click the Audio Setup tab.
•In the resulting view, select 1248 for both Playback Device and Recording Device.
For now, leave the other settings the same. For the record, the Block Size (sometimes called the buffer) is how you control audio latency.

Now let's add some tracks. At this point we are assuming you want to record on two mics.
•From the Tracks menu, select Add Tracks to open the Add Tracks window.
•In the Add Tracks window, add 2 Mono audio tracks named Voice as shown.
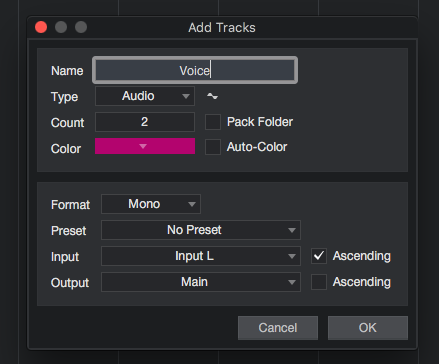
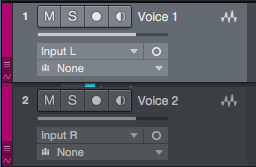
•Click OK to create two new tracks in your song.
s4
So now, let's make the signal connection to these two tracks.
•At the left of Voice 1 track, click Input L
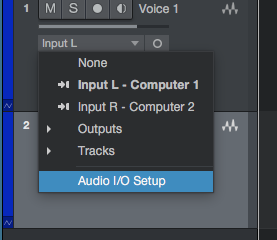
•In that dialogue, click Audio IO Setup, then in the resulting window, click the Audio IO Setup tab.
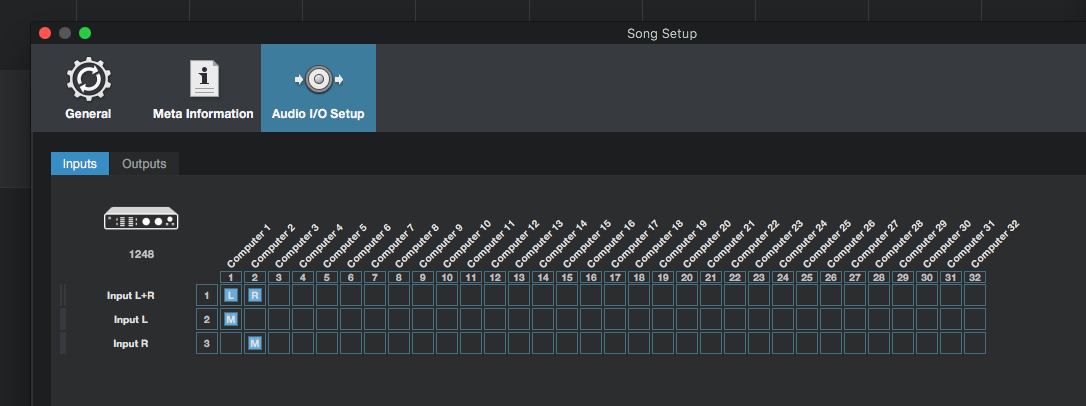
Look familiar? It should. This view shows the 32 inputs made available from the USB connection to the 1248 (just like in the Audio MIDI Setup utility).
The inputs along the top show a connection to Computer 1-2 from the 1248, and the outputs along the side are made available to tracks. Studio One has arbitrarily named the Input L and Input R (you could rename them if you wanted).
So, in summary, signals from the 2 mics should now be coming into the two respective Studio One tracks. Are they?
To find out, put each of the two S1 tracks into record mode.
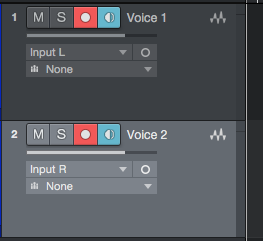
When we've done this, we say we've "armed" the tracks. Notice we're not actually recording because the transport is not moving, but we should now see a signal from the mics in the track meters.
But we're not hearing that signal, because we haven't yet made a connection to the control room speakers.
s5
In the studio, the large Presonus speakers are connected to the Drawmer output A. So audio coming in to the Drawmer would play on the those speakers.
As it happens, the 1248 outputs regular analog audio from several ports. One stereo pair is labeled Main L-R and another Monitor L-R.

These two outputs are connected directly to the Drawer Sources P1 and P2 respectively.
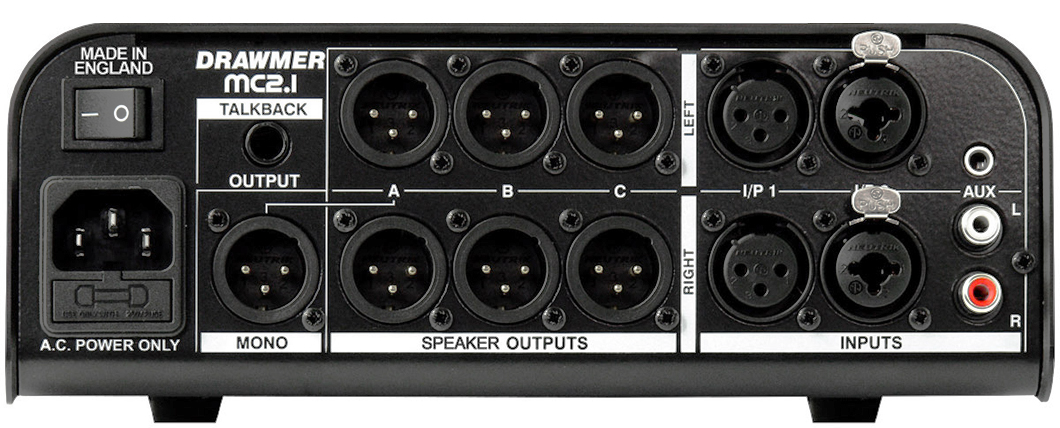
So if we connect the audio coming from the input to the computer to the inputs to the Drawmer, we can hear that over the speakers. Let's make that connection.
•In the MOTU Matrix, connect the outputs from Computer 1-2 to the first 8 outputs of the 1248 as shown.
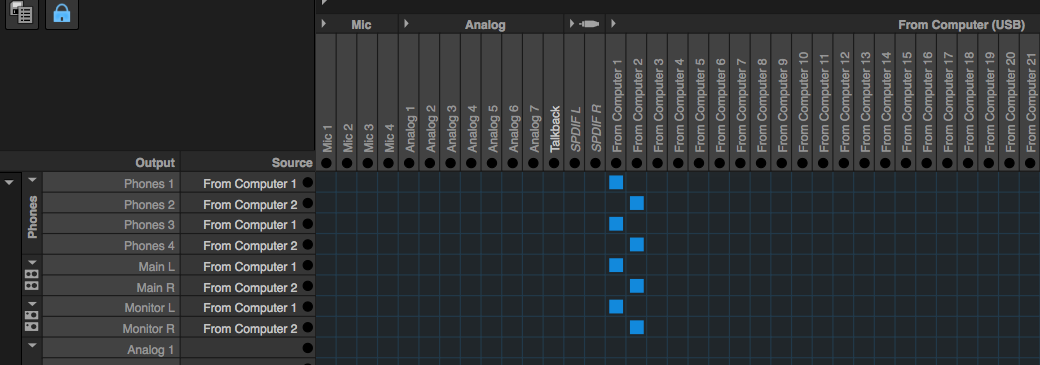
Notice that we are also sending this signal to the 4 stereo headphone outputs on the 1248.
So now you should be hearing the output from Studio One in the control room speakers.
s6
In the Matrix, we've just seen that the From Computer connections across the top allows a connection from the Studio One output to the control room speakers.
So how do we get audio to the talent's headphones in the booth?
First of all, headphones in the booth are plugged into the Behringer Powerplay headphone amp, so any signal going there is what the talent will hear.
The MOTU 8M in the booth has 8 analog outputs.

Outputs 1-2 of the 8M are directly cabled to the Main Input 1 L-R input of the Behringer.

So to get to the headphones, we would need to send a signal to the 8M analog outputs 1-2.
In the Matrix, look in the lower part of the output column where it says AVB Stream 1 1 and so forth.
As mentioned, the 1248 connects via AVB to the 8M with 4 streams of data, each with 8 channels of audio coming and going.
So AVB Stream 1 1 in the output section means a signal sent on AVB stream 1, channel 1 to the 8M analog output 1—which happens to be connected to the Behringer. Ditto AVB Stream 1 2.
How do we connect in the Matrix? Like so…
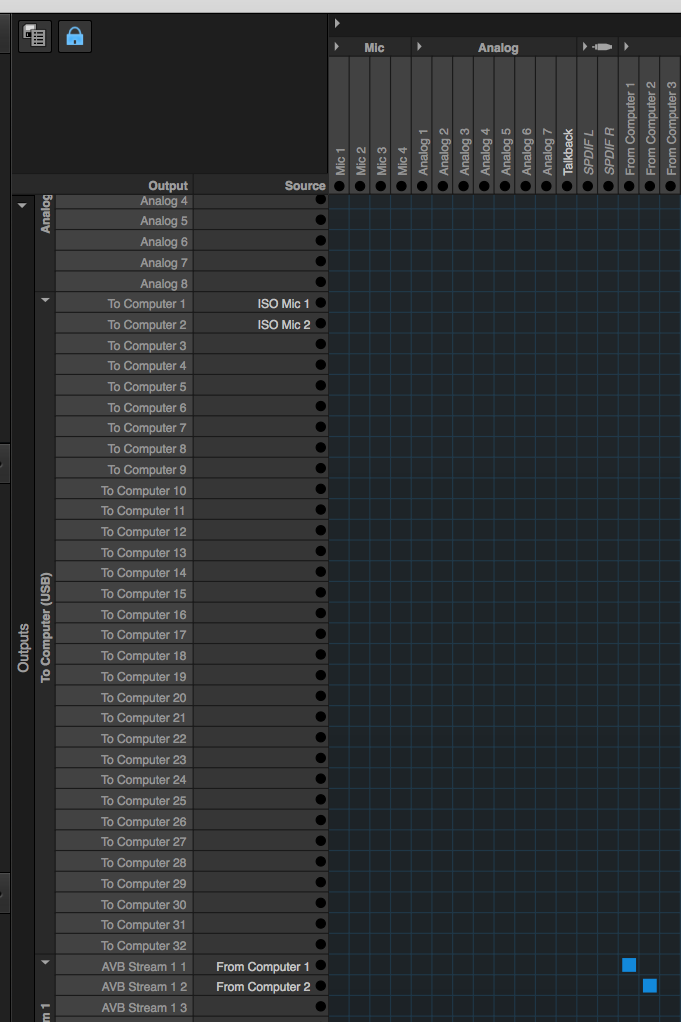
In other words, the same outpust From Computer 1-2 (the Studio One output of the mic signal) now connect to the output 1-2 of the 8M, and then to the headphones.
s7
For talkback to the booth, we use the Roland speaker.
The Roland is directly connected to the analog output 8 of the 8M. So anything sent to that output goes to that speaker.
Where do we make that connection in the Matrix?
First, look at the top left of the horizontal part of the Matrix. This shows the analog inputs into the 1248.
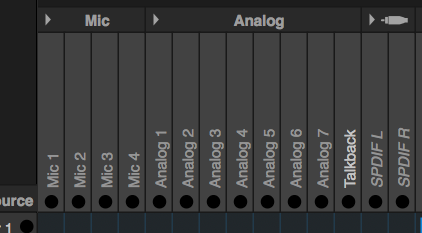
Check the pic of the bottom of the 1248, you'll see corresponding jacks—4 mic inputs, and 8 1/4" inputs.
On the Matrix, the analog inputs are named Analog 1 and so forth, except Analog 8 which has been renamed Talkback.
As it happens, the Talkback output of the Drawmer is connected directly to that analog input of the 1248. So anytime you hit the Talkback button on the Drawmer, you send a signal to the Talkback input (Analog 8) on the 1248.
So, let's make the Matrix connection. If you follow the talkback input vertically all the way down to the AVB Stream 1 section, you see we can connect to the output of the 8M via AVB stream 1 8. When we do, it looks like this—

So now, if things are connected properly and turned on, if you hit the talkback, sounds in the control room will come out of the Roland Speaker.
s8
So now, the most important step of recording the voice, needs the least explanation.
•With the Voice tracks armed, get a voice level on the two mics.
As described above, this can be controlled in the Motu App Device tab using the 8M Trim.
•Using talkback, make sure talent is ready to record.
•When ready, click Record in Studio One transport, and record your audio.
•When finished with a take, stop transport and Save.
It should be reflexive to always be Saving your file after making any change.
•For your first take, rewind your recording, un-arm the tracks, and check the recording.
You are checking several things--to make sure you have a recording, the quality of the recording, and the quality of the performance.
After the first take you may not want to keep checking takes each time, as it might interrupt the creative flow with the talent.
It is typical when doing multiple takes of the same material to keep track of them. The talent might say "take 2" and so forth. You might log the takes, and mark the one or ones that seem the best. This will save time later when editing things down.
SOURCE AND PLAY MODES
In a DAW, when you arm a track, you are putting into "source" mode. This means that it is passing through the incoming signal, in this case the sound from the mics. It stays in source mode as you record.
When you un-arm a track, it changes to "play" mode. At this point, it will mute the incoming signal and instead output any audio contained on the track as it plays.
s9
When your recording is complete, it's important to save and archive your project properly.
For one thing, you don't want to leave your project files on the control room computer. This drive is cleared regularly, and it's bad practice to leave files on a public computer.
Secondly, with computer data, we like to have it backed up in at least two, and ideally three spots.
Thirdly, you will likely be doing the editing of your project elsewhere, so you'd need to make your files available there. These guidelines apply even if you plan to edit in the SAMP Studio.
•Save your project.
Duh. But in the past I've forgotten to save at this point, with attendant disaster ensuing.
•Copy your project files to an off-site location.
This might be your a USB drive, your H-Drive, Dropbox.com, Google Drive, or some other cloud storage service.
Make sure to copy the entire project folder intact. Don't try to cherry pick specific files unless you know what you are doing.
•Copy your project files to a second off-site location.
Always important to save files to two (or even three) places.
•When your project files are backed up, drag your project files to the computer's trash.
You don't need to empty the trash. And in fact your files may be there for a short time if you have a problem. The important thing is to get them off the Mac Desktop.
PRESETS
Just a word about the Matrix setup and presets.
When you work in the studio and call up the Matrix, it will return to the last user's setup. Be careful and don't assume things are in a default mode.
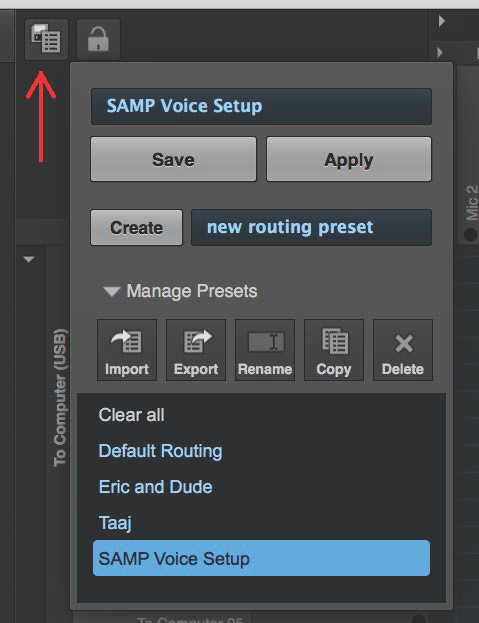
As you begin to work with the Matrix, you can put things in a default situation by recalling the Default Routing preset. After you've selected it, make sure to hit Apply.
After you've made changes, you can save your setup using this same dialogue.
I've saved the presets discussed in this tutorial as a Matrix Setup called SAMP Voice Setup. After you understand the tutorial content, feel free to use it if you like--
Important: if you make any changes to the MOTU Discovery settings, either change them back, or revert to the Default Routing before quitting your project.