Temp Track
Editing Audio to Picture
top instructions
desc
You are asked to create a "temp track" using some provided music or music of your own choice.
Regarding the Credits for this ProjectThe purpose of putting credits on your project is to identify your work to a prospective client screening your reel.
When the credits are put at the start of the video, we want audio (music) under the credits so the viewer knows their audio system is working and can set a level.This particular project demonstrates editing skill, so we want a soundtrack that exactly fits the film itself, independent of any credits.
So, first complete your edited score that starts and stops with the video itself and export it.
At that point, you have two options--
•You can tack on credits at the end, then export a second file and submit. These credits would not need sound.
•You can put credits on at the start, then export a file and submit. These credits would need sound, but the sound would need to end before the start of the video itself.I would not recommend putting credits on before you start the project. The way the project is set up reflects how a real-world project would work, and what you submit to your client wouldn't need or have credits. You'd add them later for your reel.
s1
•On your desktop, create a new folder called Film 3. Keep all your project files in this folder.
Remember to back up your work, and don't store files on your lab Mac.
•From this links above, download the project video and the two sound effects to your new folder.
•As with previous films this term, create a project in your DAW of choice, import the film, and locate its first frame to SMPTE Code 1:00:00:00.
Note: This is not a trivial step. As before, since your film has pre-roll, you will need to add an offset to your video to make the window code line up properly.
Incidentally, receiving video where the window code shows the first frame of video with a time of 1:00:00:00 is not uncommon. And sometimes, you can request this of your client--it makes things easier because your sequence transport shows the same numbers as the window burn.
s2
The project video is called Blue Pullman, which has a "countdown" at the front and a time code window burn for location reference. The timecode for the start of the video is 1:00:00:00.
The resources above feature two music tracks, John Henry and Pacific 231. Your job is to create a temp track that combines these two pieces of music is a creative way.
Alternately, you may choose music yourself. We're not concerned with copyright because we don't plan to share the result publicly.
The main rule is that the finished video features music that starts and ends exactly where the movie does. So let's start by setting markers that outline those points.
•In your DAW of choice, place a marker at the start of the sequence (MIDI location 1/1/000). Name the marker START.
Ideally, this corresponds to SMPTE code 1:00:00:00, and the first frame of picture.
•Likewise, find the last frame of picture and drop a marker named END.
•For each marker, click in its LOCK column to lock it.
Actually, since this project doesn't involve MIDI, we wouldn't be changing tempo, so we don't necessarily need to lock things. However, it's good policy to lock things that correspond to picture generally.
Now let's do some "spotting"--locating specific points in the film where music might sync to picture.
•Locate to the cut to the shot in which the engine-driver increases the speed control (1:00:23;21).
•Create a locked marker at that point named Faster.
•Place a locked marker at the point where the cabin door begins to open named Door Open.
•Now create additional locked markers for points in the film that may be musically significant.
s3
•In your DAW, create two mono and two stereo audio tracks, labeled SFX 1, SFX 2, SFX 3, SFX 4.
•Place the 2-Pop effect at the point where the academy leader strikes 2.
We will end up discarding this part of the sequence, but we should generally get used to inserting an audio 2-pop in film projects.
•Place the door opening effect at the start of that event, and edit to fit the scene. Include an off-screen door slam.
•If you like, you can place additional sound effects as needed.
s4
These instructions suggest a way to work with the two provided music tracks. You may decide to work in a different way, or with different music.
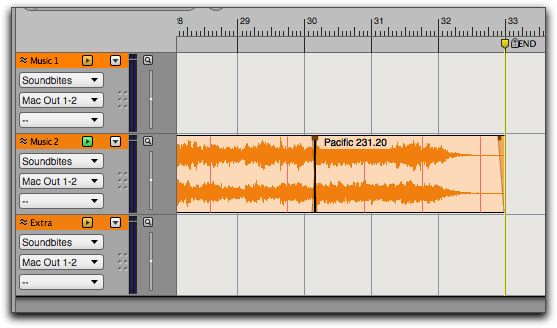
I started with John Henry at the start of picture.

As I worked on this, I found a good place to start in the middle, faster section of Pacific 231, and put that start point directly below the ending chord of soundbite 1 so that they overlap.
I then took the ending note from soundbite 2 and pasted it over my soundbite 2 edit so that it ends at the end of the film, allowing for "ring-out." I ended up shortening the ending note a bit so that it worked better with the previous music.
I made liberal use of an extra track to move things back and forth, and put fades where they seemed appropriate. I made sure that the ending soundbite did not overlap the last frame of picture.
This process is very subjective. Your edit of soundbite 2 will be different--and you might make more than one edit or even use a different piece.
At any rate, when you have a soundtrack you are happy with, continue to the end game.
s5
•After your sound track is complete, play it back and check the volume levels of the various tracks. Adjust as needed.
Depending on what music you are using, you may or may not need to "master." But make sure the music balances and the SFX are at a good volume.
•As you set up to bounce, use your START and END markers to set the bounce parameters.
•Bounce your video in the manner your DAW requires.
•Add credits in the manner you choose (see notes above) an create a new, final movie file.
•Upload your video to your Vimeo account, and post the link in the class spread sheet.
•When your video is posted, go to D2L and provide a discussion review of a colleague's work for this film.