Pro Tools Mix Project
Project Description
You have received 8 tracks of audio"stems" from a client. You are asked to mix the files into a stereo master.
Create Project & Import Audio
•On your computer, start Pro Tools M-Powered by clicking its icon in the Dock.
You need to be logged in to the OMTS account, and both an iLock and an M-Audio audio interface need to be connected to the computer.
As the program boots, you may get a startup screen of some kind. If so, click Cancel.
•Go File > New Session to open the New Session window, then, create a new "blank" session named Session Mixwith these settings:
Audio Type: AIFF
Bit Depth: 16-bit
Sample Rate: 44.1 kHz
I/O Settings: Stereo Mix
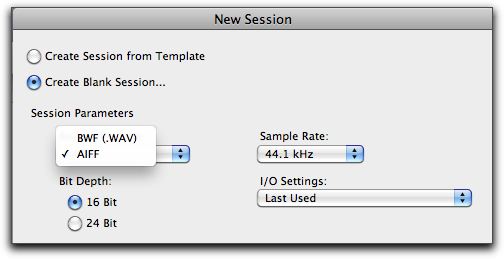
--and save it in your work folder.
•As the session starts, go Window > Edit to put the focus on the Edit window in Pro Tools.
•Make sure you can see the Regions panel on the right hand side of the window.
•Insert the OMTS Session Stems audio DVD and give it a moment to process.
•IN Pro Tools, go File > Import > Audio to open the Open window.
•In the Open window, navigate to your DVD, and then to the song and take you want to import.
•In the top section of the window, highlight all 8 tracks.
The track names should appear below in the Regions in Current File box.
•Make sure all 8 tracks are highlighted in the Regions in Current File box. Click the Convert button to include the file names in the Regions to Import box. Make sure all 8 tracks are highlighted in the Regions to Importt box.
•Click Done, the select the Audio Files folder inside your session folder as your destination folder.
You import will process. This process may take a few moments for Pro Tools to pull the audio from the data DVD.
•When processing has completed, choose New Track from Audio Import Options window with a location of Session Start.
This will place your 8 tracks on new tracks in the Pro Tools edit window.
Notice that Pro Tools creates new tracks for you named after the sound files you are importing.
Also notice that new audio files are listed in the Regions panel at the right of the Edit window.
Name Tracks & Create Preliminary Mix
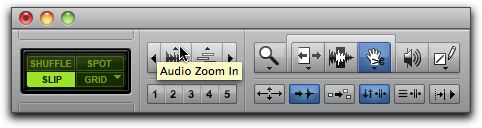
•With the audio imported, use the Audio Zoom In control to increase the height of the audio waveforms in the window.
•Using your session notes, along with Solo or Mute controls, monitor, analyze, and rename each track depending on its content.
You could use mic names, instrument names, or other criteria to name your tracks.
You can hide or reorder the tracks in the Track List.
•In the Mix window, use Solo, Mute, Volume, and Pan controls to create a preliminary mix.
You might put a Trim plug-in on the top slot of each track to set broad stroke volume control.
You can loop playback by selecting a region of audio, then go Options > Loop Playback (Shift-Command-L).
Your goal at this point is balance. There are several ways to approach this:
- Start with low end (bass) and work upward in pitch
- Start with a lead instrument, then the mix around it
There is no "correct" approach. Use the one that suits your aesthetic and don't hesitate to experiment. You can modify as you go along.
Use Effects & Automation
First we want to add an effect to a single track as an insert.
•Solo one of the tracks.
•Front the track's channelstrip, select and insert a plugin.
•In the plugin's interface window, use the controls to create a pleasing effect.
•Listen the track in context and adjust mix accordingly.
We will discuss this in class.
Now we want to provide an effect that any of the tracks can access via a Send.
•In the Mix view, go Track > New. In the resulting window, select 1 new Stereo Aux Input track and click Create.
This will add an Aux Input track to your window. If you want to move it, grab the bottom of the channelstrip and move it left or right.
•In the new Aux track, set the Input to Bus 1-2, and make sure the Output matches that of the other tracks in your Session (Out 1-2).
•In the new Aux track, access the second Insert, and go multichannel plug-in > Reverb > D-Verb to insert this plug-in.
•In the D-Verb interface window, from the Preset menu, choose Plate Bright.
•Make sure the Mix is set to 100%.
•Now on each of the audio track channelstrips, add a Send to the top Send insert set to Bus 1-2.
•For each Send, set its output to 0.
•Now make adjustments to each channel's Send to create a reverb structure. You can use Solo (make sure to Solo the Aux, too) and the Volume of the Aux track to help with this.
You may need to make small adujustments to your Volume and Pan controls on the channels as reverb will add volume and obscure stereo separation when added.
Apply Mastering Tools
When you have a mix you like, proceed to the "mastering" step where we add changes to the overall track.
•In the Mix view, go Track > New. In the resulting window, select 1 new Stereo Master Fader and click Create.
This will add a Master Fader to your window. If you want to move it, grab the bottom of the channelstrip and move it left or right.
•In the new Master Fader track, make sure the Output matches that of the other tracks in your Session (Out 1-2).
•In the bottom insert slot, go multichannel plug-in > Dynamics > Compressor/Limiter Dyn 3 to insert this plug-in.
•In the resulting window, from the Present menu, choose Hard Limiting.
•Set the Threshold to .5
•Hit Play, then turn up the Gain until the signal approaches the top of the right meter without hitting the red.
Actually, you may want to the red occasionally. You are making your track "louder" without exceeding digital 0, which may be a good thing for your mix.
You might leave this meter on the screen to check overall level as you continue.
•In slot above the bottom slot, add any additional "mastering" plug-ins as indicated.
Bounce & Share
•When you have a mix that you are happy with, bounce your project into a stereo audio file and share it as instructed for your particular class.