Digital Performer/Standard MIDI File/Finale Notation Project
(This project uses Digital Performer vs. 7/Finale vs. 2009)
Project Description
Your choir director gives you the sheet music for a Bach chorale, and asks you to do the following:
1) Notate separate parts for each choral section (SATB)
2) Take the key down a whole step
3) Create an audio track of the piece played by piano
4) Create a similar track that accentuates the tenor part
This assignment is written for Digital Performer vs. 5.13 and Finale 2007c.
Part 1: Notation in Digital Performer
--FIND ASSIGNMENT FILES & CREATE A PROJECT FOLDER
•Download the project folder from the top of the page.
A compressed file will download, and create a folder called In All Project on your desktop.
•Rename the folder Lastname.Firstname.InAll.
For the file name, use your own last name and first name to name the file.
•Open the folder and locate the file inall.perf, and drag the icon to the Digital Performer icon in the Dock to open it in Digital Performer.
This project uses the AppleDLS Software Synth as the sound module, named DLS in this project. If the settings in the Output column of your MIDI tracks is italicized, reassign them to the DLS as described here.
This instructions for this project assume you are NOT using the Consolidated Window in Digital Performer. You are welcome to do so if you want, but you may need to translate some of the window-specific instructions. If you are unsure, or want to change the Consolidated window settings, go Digital Performer > Preferences to open the Preferences & Settings window. In the left-hand column, find the area marked Display and click Consolidated Windows to open the Consolidated Windows Options. In this window, either highlight or un-highlight the box next to Enable Consolidated Settings to correspond to your choice.
--ENTER NOTATION DATA IN DIGITAL PERFORMER:
•Select all four MIDI tracks (highlight all track names), then go Project > Quickscribe Editor to open the Quickscribe Editor.
This window show the project's MIDI data in music notation form.
•In the lower left corner of the Quickscribe Editor, click the Track Selector button.
![]()
Notice that this button alternately opens and closes a panel on the window's left-hand side with a list of the current MIDI tracks. Click so that this column, the Track Select Column, is showing.
•In the Track Select column, option-click the Soprano track to select it by itself.
•Now click the Alto track.
You should now see staves for both the Soprano and Alto tracks in the Quickscribe window.
Some or all of the notes in the Quickscribe window may appear "hollow," not solid the way you might expect them to. This is how DP shows that the notes have been selected. Go Edit > Deselect All (or just click somewhere in the window away from the staves) to deselect any selected notes.
•Refer to the printed sheet music In All That I Am Doing
We will hand this out in class. You can access an html page of the music, or download a pdf version from the top of the page.
•Locate the vertical bar of tools at the left of your window. Click on a quarter note to select quarter note duration.
![]()
Your cursor turns into a quarter note icon.
•In the Alto staff, place the cursor at the downbeat of measure 2, and on the second line from the bottom (G3). Click there to enter the note.
A quarter note is entered on the downbeat of measure 2. It is "hollow" to show that it's selected.
If you have a hard time putting the note in the proper place, you might "zoom" the screen to a higher resolution.

The zoom setting can be changed in the small menu at the bottom left of the Quickscribe window.
If you do happen to enter a note incorrectly, you could simply go Edit > Undo Insert Note in Track 'Alto' to undo the entry and try again.
If you want to move a note, find the vertical toolbar at the left of the window and click the Arrow tool.
![]()
Now you can drag a selected note up and down chromatically.
You can also drag selected note(s) to the right and left to move them to a different location in the sequence. You can even drag notes from staff to staff, a helpful process if you are creating an arrangement using notation.
Notice that when you select a single note, its data shows up in a line at the top of the window--this data is similar to the data you would see for the note in the Event List. This data can be double-clicked and edited.
•Continue left to right, entering notes in the proper place. To enter different note durations, select the proper duration icon in the selection window on the left.
Don't worry about the melismatic slurs, we will enter them later.
Also, Digital Performer may not give you an F#, but instead a Gb. There is a way to change that in DP, but again, don't worry about it now, we will fix it later.
•Finish entering the Alto line, and play it back to check it. If it is correct, proceed to the next step. If it is not correct, edit as needed.
•Make sure to save your project at this point.
Part 2: Saving as a Standard Midi File (SMF)
Now we want to save our project in a format that can be opened in another application, in this case Finale. The format is called Standard MIDI File, a format that can be recognized in most any sequencing application.
--SET UP YOUR SEQUENCE FOR SMF EXPORT:
Note: This section is optional.
•If you have not done so, open the file inall.perf in Digital Performer.
First we need to change the MIDI channel of the bottom three tracks.
•In the Tracks window, click in the Output column of the Alto track to access the MIDI output setting for that track.
In this menu, you select both a sound module and a MIDI channel.
•Make sure you are first selecting the DLS sound module, then select channel 2 in the list on the right.
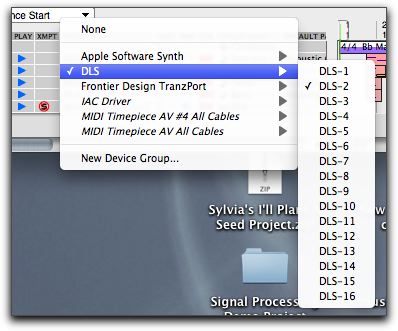
•In a similar manner, assign the Tenor track to DLS channel 3, and the Bass track to DLS channel 4.
When exporting a file as a Standard MIDI File, it is important that to assign a different MIDI channel to each track. Data on tracks that share a MIDI channel may end up on the same track in some applications including Finale.
It is possible to specify General MIDI patches in the tracks you export. However, data in the Default Patch column will not be saved in the SMF. We need to enter patch-change messages into the tracks themselves.
•Highlight the Soprano track name and go Project > Event List to open its Event List.
•At the top of the window, to the right of the plus and minus signs, locate the Insert Event Type menu.
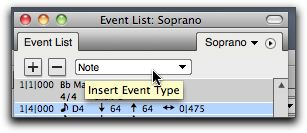
•From this menu, select Patch Change, then click the Plus (+) sign.
A data line appears.
•In the resulting data line, make sure its location is set to 1/1/000.
•Hit Return (not Enter) to enter the data line into the Event List.
At the right, you should see a patch name, e.g. Acoustic Grand Piano.
•Click on the patch name in the data line to open the General Midi Patch list.
•From this list, find and select 074 Flute.
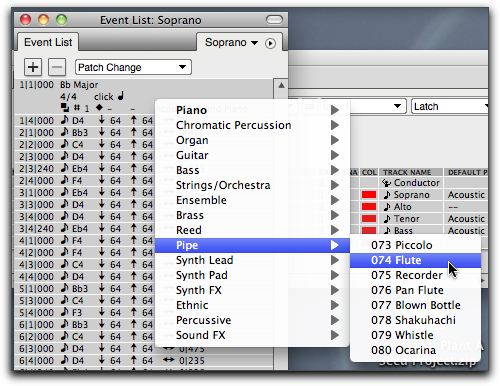
Note that the patchlist is organized into groups of 8 patches.
•When you select the patch, this menu closes. The patch change should now appear in your track at the beginning of the sequence.
•Go through a similar process to enter patch information in the other three tracks as follows: for the Alto track, insert 069 Oboe. for Tenor 072 Clarinet, and for Bass 071 Bassoon.
•Rewind to the start of the sequence, and play your tracks.
You should hear flute and oboe for your top two tracks. Note that the info in the Default Patch column didn't change--patch changes inserted into tracks takes precedence.
•Save your file.
It is a good idea to save files frequently as we work on them. It's especially important when we do a "Save As" as in the next section. If for any reason you have not saved your file properly, a Save As can result in lost data.
--SAVE AS A STANDARD MIDI FILE:
•Go File > Save As.
•In the resulting window, save as follows:
Where: Desktop
Format: Standard MIDI File
Save As: inall.mid
Standard MIDI Files use a standard extension of .mid.
Anytime you save a file, you need three pieces of information: 1) file name, 2) the location (folder) where the file will be stored, and 3) the file format. You don't usually need to worry about format, but in this case, it's important.
•Hit Save.
•If the MIDI File Options window opens, make sure Format 1 is selected.
•OK to save the file to the desktop.
•On your desktop, drag your new SMF into your project folder.
•Quit Digital Performer.
You do not need to turn this project in yet, however, you will need the SMF for the next assignment.
Part 3: Open and Save a Standard MIDI File In Finale
--OPEN AND SAVE YOUR STANDARD MIDI FILE IN FINALE
•Find the Finale icon in the Dock, and drag your new inall.mid icon to the Finale icon to import it into Finale.
Notice that a SMF will open just like a Finale file.
You may get a window called MIDI Setup. If so, hit Cancel, we will deal with this window later.
•In the Import MIDI File Options window, don't change anything. Hit OK. The file will open in Finale.
•Save the file.
--Name: inall.mus
--Location: Your project folder
--Format: Coda Notation file
When you have opened a SMF, it doesn't exist as a Finale file until you save it.
Again, when you save a file, you need three pieces of information: 1) file name, 2) the location (folder) where the file will be stored, and 3) the file format.
The suffix .mus identifies a file as a Finale file.
•In Finale, go MIDI/Audio > Device Setup > MIDI/Internal Speaker Setup to open the MIDI Setup window.
• In the MIDI Setup window, find the column labeled Input Devices. In the top menu (labeled 1-16), select the name of the MIDI keyboard controller at your work station.
This tells Finale what MIDI keyboard you want to use to input data. The name is the same as the one in your Audio MIDI Setup window.
To see (or fix) the way your MIDI keyboard is connected to the computer via a MIDI interface, click Audio MIDI Setup. Then, depending on your operating system, either click the MIDI tab, or go Window > Show MIDI Studio.
•Click OK to close the window.
Part 4: Set Up an Imported File In Finale
--ENTER FILE PARAMETERS
•With your Finale file open, go File > File Info, and enter a title (In All That I Am Doing) and composer (J. S. Bach). Hit OK. The title and composer have changed on the sheet music.
On this document, information from the File Info window have been "inserted" into text boxes, and will change when the data in the File Info window changes. This is handy for editing text that appears in multiple places in your document.
You may also enter other data here, including copyright information. The copyright symbol is made by typing Option-g.
You can access the data in the text boxes via the Text Tool.
--CHANGE STAFF NAMES
If your staff names are not shown as Soprano, Alto, Tenor, Bass, do this section. Otherwise, skip to the next section.
•Go Tools>Staff to select the Staff Tool. Double-click the top staff. In the resulting window, find the Edit button to the right of Full Name and click it. In the resulting window, replace the current name with the word Soprano and hit OK, then OK again. The name of the top staff is changed to Soprano.
When opening a SMF, the staves are given names that correspond to the MIDI instrument they are assigned to.
•Still in Staff tool, double click the second staff to again open the Staff Attributes window. In the resulting window, find the Edit button to the right of Full Name and click it. In the resulting window, replace the current name with the word Alto and hit OK.
•Now access the menu to the right of Staff Attributes for, and select the third staff from the top. Using the method previously described, change the staff Full Name to Tenor. Similarly, change the name of the bottom staff to Bass. Hit OK and notice that all four staves have correct staff names.
--FIX CLEFS
The clefs on the top two staves are correct. However, the Tenor and Bass staves should start with bass clefs.
•Access the Staff tool
•Double click the first measure of Tenor staff to access the Staff Attributes window.
•In the Staff Attributes window, find the label First Clef at the top left. Just to the right, the clef assigned to this staff is shown. Just to the right of the clef, click on the button labeled Select to open the Clef Selection window.
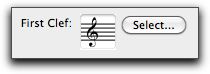
•In the Clef Selection window, click on the Bass Clef and click OK.

•Click OK again to return to the sheet music.
The Tenor staff now starts with a bass clef.
•Use a similar method to make the First Clef in the Bass part a bass clef.
Notice that the opening notes and the key signatures in the Tenor and Bass staves still represent the same pitches as before, though the clefs have changed. We will change the Tenor staff clef again later in the assignment.
--GROUP STAVES
Now we want to group the four staves and put a bracket on the left that joins them.
•Still in Staff tool, drag down over the selector boxes at the left of all four staves to select them.
Make sure you are dragging over the selector boxes on the staves, as opposed to the ones on the staff names.
•From the Staff menu, select Add Group and Bracket to open the Group Attributes window.
Notice that the group goes from Soprano to Bass, and that you are choosing to draw barlines through all staves.
•At the bottom left of the window, click on the second bracket from the right to select it.
•Click OK.
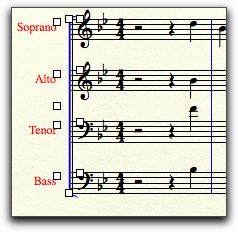
There is now a bracket placed at the left of the staves, and barlines are drawn down through all four staves.
Notice that Finale uses colors to identify certain types of data in your file. For example, your new bracket and barlines are blue. These are only for identification--you will still print in black and white.
--MAKE THE OPENING MEASURE A PICKUP MEASURE
•Go Document > Pickup Measure to open the Pickup Measure Window.
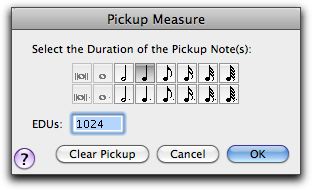
•Click on the quarter note icon, and hit OK.
Now the first measure contains only the pickup note--the rests on beat 1-3 no longer show.
Also notice that the measure numbers have changed. The first "official" measure is the first full measure of the piece.
Don't worry about spacing at this point, we will correct that in a later step.
•Take a moment and hand-correct the measures on your printed sheet music, with measure 1 being the first full measure of music.
When transcribing music into Finale, having accurate measure numbers marked on your source music is an important step.
Part 5: Enter Notes In Finale
--REGARDING HELP AND TUTORIAL FILES
As we begin note entry, you may need additional help.
Finale provides a thorough (some call it massive) help file that is accessed via a browser (in our case, Safari).
In addition, there are several excellent tutorials provided by Finale, that cover some of the topics address below.
Here's how to access them...
•From the Help menu, select Table of Contents.
Safari will open. On the left is a Table of Contents column, on the right a welcome page to the Finale User Manual.
•In the column on the left, click Tutorials.
Additional choices are displayed.
•From the additional choices, click Tutorial 1a: Simple Entry.
On the right, the Simple Entry Tutorial is displayed.
•At the bottom of the column on the right, click Search.
•In the box labeled Search at the top of the left column, type Simple Entry and click Search.
A list of found items appears in the left column.
•In the found items, click 2-Simple Entry.
On the right, Safari displays the Simple Entry Help entry, which is how the Finale User Manual explains various aspects of the software. There are similar entries for every bit of Finale operation.
At this point, you can close Safari if you like, or leave the User Manual open on your desktop. In either case, click on the Finale document window or the Finale icon in the dock to make Finale the active application.
--USE SIMPLE ENTRY TO ENTER NOTES IN FINALE
•Go Window > Simple Entry Palette to open the Simple Entry Palette--if it's already checked, leave it alone.
The Simple Entry Palette should be visible at the top of your screen.
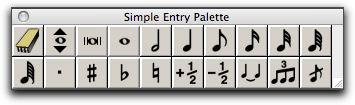
•In the Simple Entry Palettes, clcik on the quarter note icon.
The quarter note icon in the Simple Entry Palette will highlight. In addition, as your cursor nears a staff, the cursor shape will turn into a quarter note, showing you the duration you selected.
•Check the Tenor part on your sheet music.
Notice that the note on the downbeat of the first full measure is a quarter note Eb.
•Move your Simple Entry cursor to the downbeat of the first full measure of the Tenor part. Position the cursor on the second ledger line above the staff, and click.
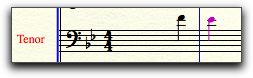
A quarter note Eb will be entered there. It is colored purple to show that it is selected.
•In a similar manner, continue through the Tenor part entering notes via Simple Entry. Change durations where necessary.
If you make a mistake, hit Command-Z to undo, or you could use the Eraser Tool in the Simple Entry Palette to remove note(s). You can change durations by selecting a different duration then clicking on the note. You can't drag notes left and right in Finale.
--ABOUT PLAYBACK
•To hear your work, find the Playback Controls (if not visible, go Window > Playback Controls). Hit the play button to hear and watch a scrolling playback. Click on the small triange to the left of the window to show more controls, and to, for example, change tempo.
--PAGE VIEW/SCROLL VIEW
•You are looking at a document in what's called Page View. Go View > Scroll View to change to Scroll View. This allows you to view music in one long strip as opposed to on individual pages. Feel free to alternate between the two views depending on which view makes things more convenient.
--MEASURE NUMBERS, LOCATING
•To jump to a specific measure number in Scroll View, highlight the current measure number in the small box at the lower left of your file window, type in the target measure number, and hit Return. The target measure number will now be at the left of your file window.
--USE SPEEDY ENTRY TO ENTER DATA IN FINALE
•Go Tools > Speedy Entry. On the Bass staff, click in the first full measure.
The Speedy Entry Edit Frame appears around this measure.
•On your MIDI controller, find the specified Bass part note, and hold it down.
•On the computer keyboard numeric keypad, hit the 4 key.
Notice that you've entered an eighth note at the desired pitch.
If a note does not appear, make sure your controller keyboard is turned on and connected to the computer. Go Applications >Utilities> Audio MIDI Setup, then click on the MIDI Devices button, (or from the Window menu, select MIDI Setup) and make sure your interface shows up and is connected to your controller. If it is, in Finale, go MIDI > Device Setup > MIDI/Internal Speaker Setup, find the Input Device column, and make sure your controller is selected in the top menu. If this still doesn't work, go to the Speedy menu and make sure Use MIDI Device for Input is checked. If this STILL doesn't work, go to a different machine, or contact your instructor.
•Refer to the Speedy Entry Keys chart. Notice that different durations of notes are selected with the numeric keypad.

•Continue through measures, entering both eighth (4 key) quarter notes (5 key), and half notes (6 key).
Note that you can add a dot to a note immediately after it has been entered.
As each measure ends, notice that the selector automatically moves to the next measure when the note values in the current measure equal the required number of beat. If you want to turn off that feature, deselect Jump to Next Measure in the Speedy menu.
Finale will occasionally enter a "wrong" note, actually a note that is enharmonically equivalent to the note you entered. In measure 8, when you enter B natural, you may get Cb. You could shift-drag the note down to the next space and hit the plus sign twice, but the quicker way is to hit the 9 key on the number pad to "flip" to the enharmonic equivalent. If you do this immediately following entry in Speedy entry, the previous note will flip to the proper note. In fact, several alterations are possible immediately after entry, including accidental alteration, courtesy accidentals, and ties.
In Speedy Entry, to add an accidental alteration to a note in Speedy Entry, position the curson on the note and hit the + or - keys to go up or down 1/2 step. To add a courtesy accidental to the note, position the curson on the note and hit the * key on the number pad. If you want it in parentheses, hit the P key.
To add (or remove) a tie, hit the = key. However, don't confuse ties with slurs. We will enter slurs a different way.
•Continue through the piece and finish inputting the Bass part.
--CHECK AND EDIT THE ENTERED NOTES
•Check back over your score, and compare to your source sheet music. Where necessary, add accidentals, flip enharmonic equivalents, add ties, and so forth.
Part 6: Editing Data in Finale
--USING SMART SHAPES (SLURS, HAIRPINS) IN FINALE:
Now we want to enter the slurs.
•Go Window > Smart Shape Palette.
The Smart Shape Palette appears on the screen.
•In the Smart Shape Palette, click on the Slur shape.

•In the Alto staff, find the G in measure 2. Double-click on it.
A slur appears connected dynamically to the next note.
•Add additional slurs as they appear in the sheet music.
To stretch a slur over more than one note, double-click on the first note, holding down the mouse on the second cick. Drag until the final note is highlighted then let go.
•In the Smart Shape Palette, click the crescendo ("expanding hairpin") icon.

•In measure 6 (measure 7 in the original sheet music), double click under the Soprano staff, and drag the resulting shape to the right to enter a crescendo hairpin under the dotted half note.
The hairpin is for the purposes of this exercise only. It is not found in the original sheet music.
--USING LYRIC TOOL IN FINALE:
•Go Tools > Lyrics to open the Lyrics Tool.
•Go Lyrics > Edit Lyrics to open the Edit Lyrics window.
•In Edit Lyrics window, enter the piece's lyrics. Be sure to hyphenate properly.
Note: You do not need to enter the underscoring that follows certain syllables in the sheet music. Those are called "word extensions" and are entered automatically by Finale.
•When finished, hit OK.
•Go Lyrics > Click Assignment. Click on the first note in the Soprano staff.
The first syllable of the lyric will be entered.
•Option-click the next note.
The rest of the lyrics will be entered.
Note that the notes line up improperly after the syllable on the word I.
•Go Lyrics > Shift Lyrics to open the Shift Lyrics window.
• In the Shift Lyrics window, for Shift Lyrics to the: select Right, and under options, select Shift Syllables by One Note, to the Next Open Note, and hit OK.
The window closes.
•Click on the first note that you want to move.
All the syllables will shift to the right.
•Continue through the piece until all syllables are lined up properly.
--RE-SPACING, MEASURES:
Finale will often take care of respacing for you when you edit your piece. Sometimes, however, you must respace manually. Here's how...
For this section, make sure you are in Page View.
•Go Tools > Selection to engage the Selection tool.
•Go Edit > Select All to select your whole piece
You could also select only a section of your piece if you chose.
•Hit the 4 key on your numberpad.
Finale respaces your measures.
•Go Utilities > Update Layout to, well, update the layout.
--RE-SPACING, STAVES:
You may find that added lyrics collide with the staves below them. Here's how to add space between staves...
•Go Tools > Staff to select the staff tool.
•In the Staff menu, select Respace Staves.
•In the resulting window, set Distance Between Staves: to a value of -1.2.
You can always change this if you want more or less space between staves.
--USING THE SELECTION TOOL IN FINALE:
The following section is for practice only, and does not affect your final project; material found here may appear on a future exam. If you want, you might first save your file, then go File > Save As to save your file under a different name, and use the new file for practice only. When you are finished, you would return to your original file. You might also just proceed, making sure to properly delete notes as mentioned in the last instruction.
•Find the Measure Tool in the Main Tools palette.

• Double-click it, and notice that a measure has been added to the end of your piece.
Double-clicking the measure tool will add a single measure at the end. Option-clicking will add a user-selected number of measures at the end.
•Option-click the Measure Tool and in the resulting window, enter 9 and hit OK to add 9 measures to the end of your piece.
You can also do this by going Measure > Add.
•Go Tools > Selection Tool to access the Selection tool.
•Locate to measure 10. Select measures 10-12 (the last three measures with music in them) by dragging over them.
You can also click measure 10 to select it, then hold down the Shift key, and click measure 12 to select all three measures.
•Now drag the upper left corner or the first measure of your selection to measure 13 (the first blank measure).
This will copy the measures to the new location.
If the measures you want to copy are too far away from the target measures, locate to the target measure and option-click in the target measure to copy the data.
•Select some music in the added measures. From the Utilities menu, select Transpose.
•In the resulting window, make a transposition.
A diatonic transposition moves notes to notes within the scale of the current key. Chromatic transpositions move all notes an exact interval independent of key.
•When you have experimented with copying and transposing, select the measures you added and hit the Delete key to remove them (or, if you created a new file, return to your original file).
--USING THE SELECTION TOOL TO DELETE MEASURES IN FINALE
At this point, we are returning to the regular tutorial, so do this even if you didn't do the section above.
You may find that when you imported from the Standard MIDI File, there are two extra measures appended to the end of your piece. Let's lose those now.
•In either Scroll View or Page View, locate the last few measure of your piece.
•Engage the Selection Tool and select any extra measures at the end of your piece.
Hit the Delete key to remove them.
--USING THE SELECTION TOOL IN FINALE TO COPY LYRICS AND MEASURE SMART SHAPES TO OTHER STAVES
At this point, you may notice that we only entered the Lyrics and Hairpin on the top staff. Let's copy those elements down into the other staves using one of the more powerful features of Finale, the ability to filter what you do and don't copy.
•Using the Selection tool, click to the left of the Soprano staff to select all measures in the Soprano part.
•Go Edit > Edit Filter to open the Edit Filter window.
•In the Edit Filter window, click None to de-select all boxes.
• In the upper-left part of the window, under Markings, click the box next to Smart Shapes (Assigned to Measures).
•In the left part of the window, under Text, click (highlight) the box next to Lyrics.
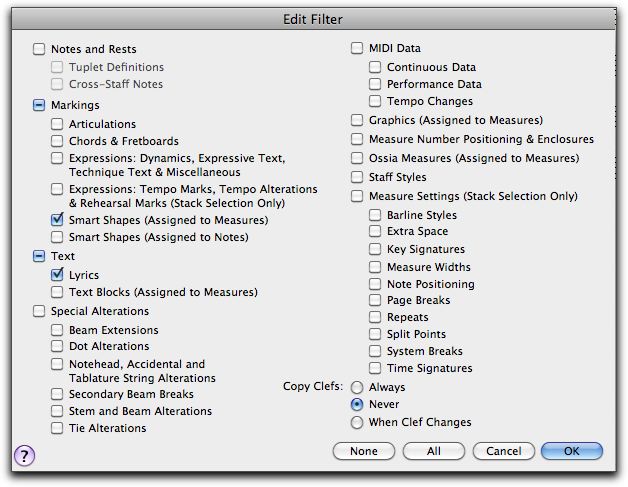
•Click OK to close the window.
You are telling Finale that you only want to copy Lyrics and the Hairpin to other staves.
•Drag the first measure in the Soprano staff to the first measure of the Alto Staff.
The lyrics and the hairpin are copied into the Alto part.
•Repeat the same steps to copy the lyrics and hairpin into the Tenor and Bass staves.
•Go Edit > Edit Filter to open the Edit Filter window again.
•In the Edit Filter window, click All, then hit OK to close the window.
Unless you do this step, Finale retains your copy settings and you (or the next user) may be perplexed why some things don't copy when you want them to next time a copy is made.
--USING ARTICULATION TOOL IN FINALE
•Go Tools > Articulations.
•In the last measure, click on the first note in the Soprano part to open the Articulation Selection window.
•In the Articulation Selection window, click on box 7 which contains the legato mark.
•Hit Select.
The legato mark articulation is placed on the note.
•Do the same for all notes in all parts in the last measure.
These articulations are for the purposes of this exercise only. They are not found in the original sheet music.
--USING EXPRESSION TOOL IN FINALE
•Go Tools > Expression.
•Double-click the first note of the Soprano part to open the Expression Selection window.
•In the Expression Selection window, in the column at the left, click to highlight Dynamics.
•In the main part of the window, click on the mp (mezzo piano) mark.
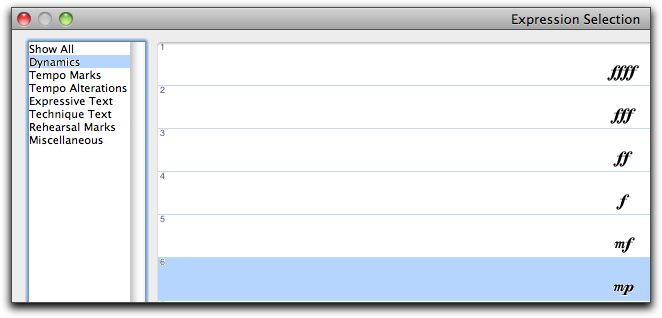
Your window may look slightly different from the above picture.
•Click Assign to close the window.
You should see a green mp in your score.
•Drag the mp to the proper location (just to the left of the first lyric).
•Do the same in each of the other parts.
•In a similar manner, enter an f (forte) symbol at the downbeat of measure 7 (measure 8 in the original sheet music) in all parts.
These expressions are for the purposes of this exercise only. They are not found in the original sheet music.
--TRANSPOSING USING THE KEY SIGNATURE TOOL IN FINALE
•Go Tools > Key Signature.
•Double click in the first measure of the Soprano staff to open the Key Signature window.
•In the Key Signature window, find the staff at the top of the window. Use the arrows next to the key signature to navigate to the key of Ab major.
Clicking the up arrow adds a sharp or subtracts a flat from the key signature. Clicking the down arrow adds a flat or subtracts a sharp from the key signature.
•Make sure you have selected measure #1 to end of piece as a Measure Region.
•For Transposition options, select Transpose Notes Down.
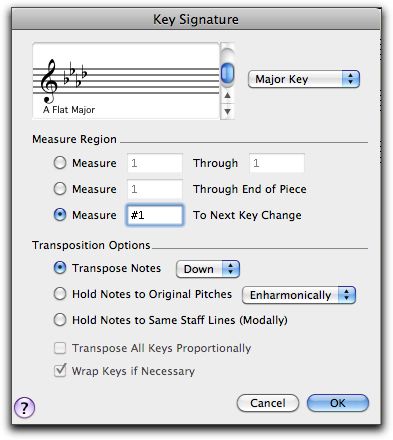
•Click OK to close the window.
Notice that this transposes your entire piece to the new key, including all notes. Notice that items attached to notes move with the notes.
--CHECK AND CLEAN UP YOUR MUSIC
•Carefully go through your sheet music and check notes, expressions, lyrics, and so forth, correcting any errors and making slight position changes as needed.
•If you want, take a look at the finished music PDF linked at the top of the page. You might also play the file to make sure it sounds OK.
•When finished, move to the next step.
--CREATE A PDF VERSION OF YOUR FILE
To share files via email or on a website, you want to create a PDF document of your Finale file. The following assumes you are using System 10.3.9 or later on a Macintosh computer.
•Check your file once and make sure you like the way it looks.
Once you have saved as a PDF document, you can't make changes without going back to your Finale file.
•Go File > Print to open the Print window.
You would also do this if you wanted to print. In that case, you would select a printer and hit Print. However, we can also use the Print window to save as a PDF file.
•In the lower left-hand corner, find the PDF menu button. Click it to open its menu. Select Save as PDF.
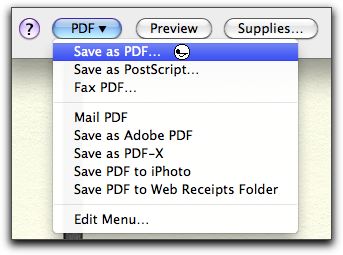
•In the resulting window, give your file the name inall.pdf, locate to your project folder, and click Save.
Your file will be saved as a PDF format file.
•In your project folder, find the file you just made. Double click it to open it in a PDF viewer.
Check your PDF file before proceeding, and, if necessary, repeat these steps until you have a file you like.
--CREATE AN AUDIO FILE OF YOUR MUSIC
•If you have not done so already, locate the Playback controls.
If they are not visible, go Window > Playback Controls.
•Click the play button to hear and watch a scrolling playback.
Click on the small triange to the left of the window to show more controls, and to, for example, change tempo.
•If you like the way your file sounds, proceed to the next step. If not, go back and make corrections, until you get a playback that you like.
•Now we want to create an audio file that could be put on a CD or posted to the Internet. To do this, go File > Export to Audio File.
•In a moment, you will see a standard save window. Enter data as follows:
--Name: inall.aif
--Location: Your project folder
--Format: Standard Audio File
The Standard Audio File setting will save your file in AIFF format, a "full-sized" audio format that can be put onto an audio CD. The Compressed MP3 File setting will save your file in mp3 format, a "compressed" audio format that is suitable for posting to a website or adding to an mp3 player like iPod.
--MAKE THE TENOR PART LOUDER
In Finale 2006 or later, this can easilty be done using controls found in View > Studio View. Those controls use MIDI volume controls to affect loudness, much like the Mixing Board controls in Digital Performer. To do that, each staff would need to be assigned to its own MIDI channel.
However, in our exercise we want to change the velocities of the actual MIDI notes in the Tenor part.
You may recall that MIDI velocity controls how loudly (or perhaps intensely) MIDI patches sound, and that settings can range from 0 to 127.
Just to be safe, we are going to work with a new version of the Finale file.
•First, make sure your Finale file is saved.
•Then go File > Save As.
•In the resulting window, save your file with the name inall_tenor.mus.
Now we will make the velocity changes.
•From the Tools menu, select the MIDI tool.
Make sure you are using the MIDI tool, not the MIDI menu in the menu bar.
•With the MIDI tool engaged, go Edit > Select All to select all measures in all staves.
•In the menu bar at the top of the window, access the MIDI Tool menu. Select Key Velocities--a checkmark will appear (or remain) next to Key Velocities.
•Access the MIDI Tool menu again, and select Set To to open the Set To window.
•In the Set To window, Set Key Velocities to 64.
•Click OK to close the window.
Nothing visible has changed, but now velocities for all notes has been set to a value of 64.
•Now click to the left of the Tenor staff to select it.
•Using the same method, set its key velocities to 115.
•Playback your file and check to see if these settings sound right to you. Make any necessary changes to create the rehearsal tool asked for by your choir director.
--CREATE AN AUDIO FILE OF YOUR TENOR PART
•First, go File > Save to save your the tenor-enhanced version of your Finale file.
•Now use the method described above to create an AIFF file of your tenor version. Use the name inall_tenor.aif and save in your project folder.
--TURN IN YOUR ASSIGNMENT:
•When you have completed the project, turn in the whole project folder to In All Project folder in the Drop Box folder for this Course.
Your project folder should contain the following files (names may reflect later file versions):
inall.perf (the Digital Performer file with the Alto line and patches in it)
inall.mid (the Standard MIDI File of your DP file)
inall.mus (your completed Finale file)
inall.pdf (the PDF version of your Finale file)
inall_tenor.mus (the Finale file that has the enhanced tenor part)
inall.aif (the audio file of your Finale file)
inall_tenor.aif (the audio file of the tenor enhanced Finale file
Make sure you confirm that your folder is named Lastname.Firstname.InAll and that it is turned into the correct location in the Drop Box.
Check your course website for the due date for this assignment.
Portland State University