Digital Performer Project • Version 7.4
Focus on Recording MIDI Data Into a Sequencer
top instructions
Project Description
Your song writing partner has come up with a simple chord progression and wants you to flesh it out. You should:
1) Create a bass line that works with the chords
2) Create a drum part
3) Add additional tracks with instruments of your choice
4) Mix your music
Part 1: Recording MIDI Data in Digital Performer
•As in previous tutorials, download the project files at the link posted above.
This will download a "zip" file called Chords_Project_DP7.zip. This is a data-compressed file suitable for distribution on the Internet.
•Double-click the zip file to create a new, uncompressed folde named Chords_Project_DP7.
•Rename the folder Lastname.Firstname.Chords. Move the folder to your local work folder.
•Open the folder, and find the file chords.perf. Open the file in Digital Performer by dragging its icon to the DP logo in the Dock.
This project uses the AppleDLS Software Synth as the sound module. If the output of your tracks is italicized, reassign them to the DLS as described here.
•Connect your headphones to the audio output of the computer, and test to make sure you are hearing audio.
Audio volume on a Mac can be muted, turned down, or turned up using the 3 "speaker" keys at the top of your numeric keyboard.
--SET UP METRONOME AND PLAY PARAMETERS
•Find the metronome icon on the Transport bar, and double click it to open the Click and Countoff window.
![]()
•In the Click and Countoff window, data should match the following:
Type of Click: MIDI
Options: Always Click
MIDI Click Accented: DLS-10
Pitch: D#4 (Eb4)
Velocity: 127
MIDI Click Normal: DLS-10
Pitch: D#4 (Eb4)
Velocity: 90
If the Audition Click box is highlighted, you should hear a woodblock sound, with an accented downbeat.
If you have entered these setting and don't hear the click sound, close the window, arm the Kik track, play the MIDI keyboard to trigger some drum sounds, then hit Play and play a few bars of your sequence. This should "kick-start" the click. Open the Metronome setting window and try again. If these instructions are confusing or this still doesn't work, check with your instructor.
•In the Navigation window, ust down and to the left from the metronome icon, find and access the Tempo Control Menu.
•in this menu, find and select Tempo Slider.
You are telling DP to use the "Tempo Slider" to control the sequence tempo rather than the Conductor Track.
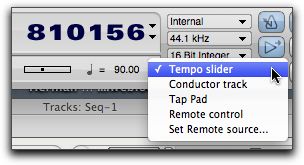
•In the box to the left of the Tempo Control Menu, enter a tempo of quarter note = 90.
•If the metronome icon is not highlighted, click it once to highlight it (turn on the metronome).
•Locate to the beginning of the sequence.
You can do this by hitting the rewind button in the transport window, or use the shortcut--the 1 key on the numberpad.
•Hit the Play button in the transport (or hit the Space bar or Enter key) to play the track and make sure you can hear the chords and the metronome.
You can stop transport with the Stop button in the Transport window, hitting the Space bar again, or the 0 key on the numberpad.
--ARM A TRACK FOR RECORDING
•In the bottom window, make sure you are in Tracks view (if necessary, click the Tracks tab)
•On the left-hand side of the Tracks view, find the Bass track. Click on the Record icon at the far left of the track to "arm" the bass track for recording. It turns red.
![]()
Since DP files are individually configurable, items in your Tracks window may look slightly different on different machines.
•Play some notes on your MIDI controller keyboard. You should hear some bass sounds.
In DP, to hear the sounds of an individual instrument in a sequence, you must "arm" its track to record.
If you do not hear a bass sound, first click on the volume controls in your number pad to make sure you are hearing audio from your computer through your headphones. Then make sure you have turned on your MIDI controller.
If it is still not working, go to the Studio menu, and make sure MIDI Patch Thru is checked. If it is not, select MIDI Patch Thru, and, in the resulting window, select Auto Channelize.
If you still do not hear audio, ask for help.
•Locate the transport to the first measure of music.
In this sequence, the first measure of music is measure 3. It is typical of a sequenced project to leave a couple of measures of silence at the beginning to allow for patch changes and other controller information to take effect.
To locate to measure 3, click in the measure box of the large locator in the Transport window to select the data, and type 3. Then hit Tab, and type 1 into the beats box, then hit Tab and type 0 into the sub-beats box. Hit Return, and your sequence will locate to 3/0/000.
There are several other ways to locate to a specific location.
--ABOUT REAL-TIME RECORDING
Real-time recording is one way to enter MIDI data into a sequencer. Since it involves actually "performing" the data, it is the most expressive and "natural" way of recording a part. We will be using the MIDI controller keyboard to enter the data, but sequencers can receive MIDI data from many different types of recorders. For this exercise, those with piano-keyboard skills will have an advantage, but MIDI editing allows the rest of us to enter most all data at an acceptable level.
To perform real-time recording, we could just start recording, but we would have no way to "sync" our performance to the measure/beat/sub-beat parameters of the project. To record data in sync, we need to be able to hear some sort of preparatory metronome track.
There are two main ways of recording in sync with a metronome track: 1) using Countoff, which will start recording after a set number of measures, and 2) using Wait, which will start recording when the first MIDI note of the performance is played.
--RECORDING USING COUNTOFF
•Click on the Countoff button next to the Metronome button to highlight it.

The button will be labeled with the number of countoff bars set in the Click and Countoff Preferences window.
•Press the Record button in the transport (the shortcut is the 3 key in number pad). The metronome will countoff two measures before the transport starts.
•Using Countoff Method, record 4 bars of bass. Hit the Space bar to stop when you are done.
After the countoff, DP will record whatever you play. If you like what you played, save your file and go to the next step. If you don't like it, you can go Edit > Undo to toss it, or just record over it--the new "take" will erase whatever was there before.
Don't worry if what you played was not rhythmically perfect, we will correct a sloppy performance later using "Quantizing."
--RECORDING USING WAIT
•Locate the transport to measure 7.
•Click on the Wait button next to the Countoff button to highlight it (both the Metronome and Countoff buttons should also be highlighted).

•Press the Record button in the transport (or 3 key in number pad). The metronome will click indefinitely.
•When you hit any midi note, the transport will start.
•Once you have begun recording, record 4 more bars of bass. Hit the Space bar to stop when you are done.
You should now have 8 bars of bass recorded, starting at measure 3 and ending before the start of measure 11.
--QUANTIZE YOUR PERFORMANCE:
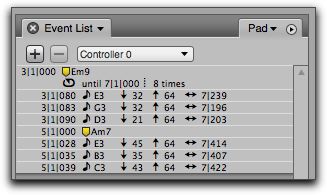
•Select the Bass track name in the Tracks window. Go Project > Event List to open the Event List for the Bass track.
In the Event List window, examine the location information for the MIDI note events. Notice that the numbers are randomly distributed, which is natural unless you have an extremely good sense of rhythm.
•In the Event List window, go Edit > Select All to select all the data in that track.
Important: make sure you are actually in the Bass Event List when you perform this action. Check to make sure that only the data in the Bass track has been selected.
•Go Region > Quantize. Select a note size that represents the smallest note duration in you performance.
In this performance, the smallest note duration was probably an eighth note.
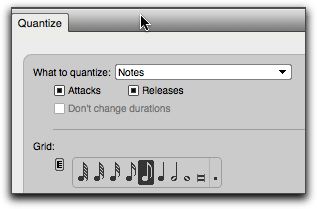
•Hit Apply. Notice how the location information changes. Play back the track and notice the difference.
Quantize works by moving a given note to the nearest exact location of the duration you entered in the Quantize window. For the Bass track, it will move each note to the exact 8th note closest to each note in question.
If you hear notes that are in the wrong place, they were either too far away from the correct location to quantize properly, or you may have selected the wrong duration.
You can always re-record or re-quantize, or you could just simply type in the correct location for the note in the Event List window.
--SAVE YOUR PROJECT:
•When you are done working, save your project.
The shortcut to Save is Command-S. Experienced users save files frequently during important work.
Part 2: Working With Drums in MIDI
In DP, we use the term Patch for the specific sound that each track makes. You can find each track's patch in the Default Patch column. Notice that the tracks at the top of the window are each assigned to a different MIDI channel, and therefore a different patch. The three tracks at the bottom of the window, however, are all assigned to MIDI channel 10, and all are assigned to the same patch, Standard Kit. That's a drum patch.
In a General MIDI Synth, most MIDI channels are able to access 128 different patches. You can click here for a General MIDI Patch List.
MIDI channel 10, however, is reserved for drums. While the other patches play the same type of sound up and down the keyboard, in a drum patch each key is assigned to a different sound. There's no correlation between the "pitch" of the key and the "pitch" of the sound.
A MIDI channel can only have one patch active on it at a time.
But several tracks can be assigned to the same MIDI channel and therefore be assigned to the same patch--that's what's going on with the tracks at the bottom of your window.
Note: DP has a strange quirk--in your main window, the Patch column is not where you change the patch of a sound. You need to do that in the Default Patch column. Why? In more advanced MIDI programming, you can put a patch change message in a track in the middle of the tune. The Patch column is only there to report the currently playing patch, not change the patch for that track.
--CREATE A KICK/RIM PART:
•In the Tracks window, find the Kick track. Click on the Record icon at the far left of the track to "arm" the Kick track for recording. It turns red.
•Play up the keyboard, and notice how the sounds are programmed differently in a General MIDI "drum" track--each note is a different instrument.
Click here for a list of General MIDI Drum Patch Assignments.
•Locate the sound for the Bass Drum and the Rim Snare. They should be the C and C# at the lowest end of your MIDI keyboard.
The bass drum in a drum set is often referred to as the Kick Drum. The Rim Snare represents hitting the rim of the snare with the stick tip resting on the center of the snare drum head.
In a MIDI pitch list, their keys would be referred to as C1 and C#1 or alternately as MIDI key numbers 36 and 37.
•Using either the Countoff or Wait recording method, create a Kick/Rim track.
•When done, quantize your track.
--USE SPLIT NOTES TO MOVE THE RIM NOTES TO THE RIM TRACK:
In DP. we often keep the drum tracks separate from each other to make editing an individual drum patch easier.
Since we just put two patches on the same track, we need to separate the Rim part from the Kick part, and put the Rim part on its own track.
We could go through and use Object Selection to find and select each Rim event.
However, DP provides several different ways of streamlining the Object Selection process. One is called Split Notes, which lets us select individual notes based on their MIDI pitch data.
•Select all the data in your Kick track.
•Go Region > Split Notes.
•In bottom of the resulting window, find the keyboard. Click on the Db at the low end of the keyboard. A small red circle appears on the key to show it has been selected.
•Under "Get notes using:" click Cut. In the menu next to "One track," select Rim.
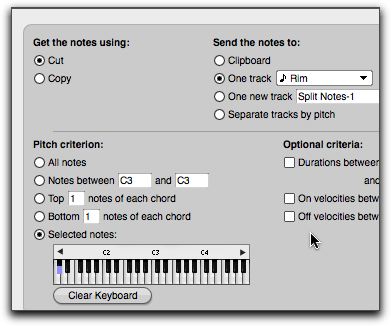
•Hit Apply. Your Rim notes have moved to the Rim track.
--ADD HI-HAT:
•Record a Hi-Hat track. The open High Hat is on the Bb key above the Bass Drum key, and the closed High Hats are on Gb and Ab below the open High Hat.
•Quantize your Hi-Hat track.
--ADD ADDITIONAL TRACK:
Now we want to add another drum track, so we need to create a new track to record on.
•Select the Hi Hat track, and go Project > Add Similar Tracks.
This will create a new track with the same parameters as the Hi Hat track, including a patch assignment of the Standard Kit on MIDI channel 10.
To create a new track with its own parameters, you could go Project > Add Track > MIDI Track.
•Find the new track that you just created. Option-click on the track name, and then type in "Shaker" to rename it.
--REGARDING STEP RECORD:
DP allows several other methods of creating new MIDI data. One method, called Step Record, allows us to simply enter individual notes, one at a time, using a MIDI controller, and independent of any metronome. It is a good way to enter parts which are very fast and share the same duration.
Parts entered via the Step Record window are you quantized as you enter them.
--USE STEP RECORD TO CREATE A SHAKER PART:
•Arm the Shaker track to put it in Record mode.
•Set your locate point to 3/1/000. Go Studio > Step Record.
•In the resulting window, select the 16th-note icon.
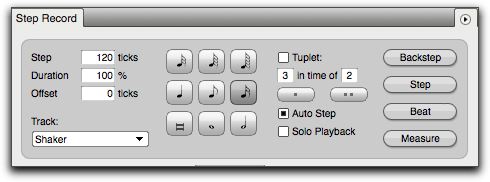
•Find the Shaker sound (Bb3) on your controller. Hit that key multiple times to fill four measures with 16th notes.
•In the Tracks veiw, drag over the four measures that you recorded on your Shaker track to select them.
•Go Edit > Copy (Command-C) to copy them.
•Click in measure 7 in the Shaker track to select it.
•Go Edit > Paste (Command-V) to paste the four measure into measures 7-10. Repeat as needed to fill out the rest of your sequence.
Part 3: Record Additional Tracks
--SET UP AND RECORD TO AN UNUSED MIDI TRACK:
•Select one of the unused tracks. In the Default Patch column, find and select an instrument that you want to add to your sequence. Rename the track to correspond to the instrument you selected.
•Record a musical part on the new track.
--CREATE ADDITIONAL TRACKS:
•Use the other tracks to record additional parts on other instruments. Quantize the tracks as needed.
•If you need more tracks, go Project > Add Track > MIDI Track to add them.
You can record onto a maximum of 16 MIDI channels, including the drum channel 10. Recall that you can assign more than one track to a given MIDI channel, meaning you can use several tracks to create an instrument group. For example, you could use 3 MIDI tracks assigned to a single MIDI channel to create a 3-part trumpet section.
Mixing a MIDI track is a complex process that addresses many issues. For this project, we want to create a simple mix so that our instruments sound balanced.
--OPEN AND SET UP THE MIXING BOARD:
•Go Project > Mixing Board to open the Mixing Board window.
•In the lower left-hand corner of the Mixer window, find the Show/Hid Track Selector button. It should be highlighted.
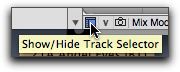
This opens a track selector column on the left of the window.
•In the Track Select column, drag down over all the tracks in your sequence to open a mixer channel for each track.
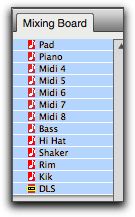
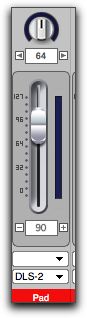
•In the Mixer window, set the volume for each MIDI track to 90 by entering 90 in the Fader Readout box at the bass of each Fader (the vertical volume controls).
--CREATE A MIX:
•Listen to your music, and adjust the mixer channel levels of your tracks to create a pleasing mix.
If you want, you could also use the Pan knob to localize your tracks in the left-right spectrum.
You can only use one volume or pan setting for each channel. For example, you can't use separate settings for each drum track since they are all controlled by MIDI control information being sent to channel 10--those controller messages will affect all data on that single channel.
I would suggest leaving the MIDI volume for the drum tracks at 90, and adjusting overall mix by changing the levels on other tracks. If you want to balance the data in the drum tracks amongst themselves, select the data in the track you want to modify, and go Region > Velocity to change the intensity of the data on that track.
Now that your creative work is done, you may want to share your song with others. Unfortunately they would need to either own Digital Performer or come over to your studio to hear your work at this point. We want to be able to distribute the song more widely, using a file format called Standard MIDI File, or SMF. This type of file usually has the extension .mid, and can be emailed or posted to a website.
Standard MIDI Files store the MIDI portion of a Digital Performer project, but nothing else. Elements like notes, control & patch messages, tempo and so forth are saved. But some elements (for example, settings in the Default Patch column) are not saved and must be added as patch event data in the tracks themselves. If you neglect to do this, a SMF created from a DP file will play with different patches, often simply a piano sound.
--ADD PATCH EVENTS TO TRACKS
•In your chords project, highlight the Pad track name, then go Project > Event List to open the Event List window for this track.
In the consolidated window, you can open the Event List in a panel to either the right or left side. Once the panel/window is open, you can use the menu at the top right to choose the track whose data you want to see.
•In the Tracks window, take note of the patch listed in the Pad track's Default Patch column (probably 090 Warm Pad).
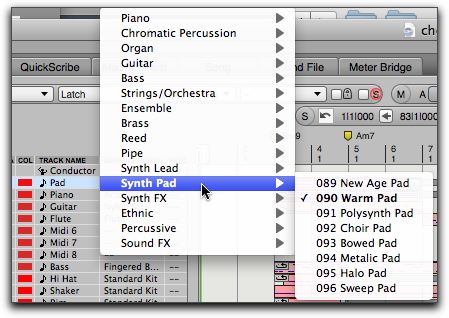
Clicking on the patch name in the Default Patch column will show you the menu of General MIDI patches, and specifically the currently-assigned patch along with its patch number. This information would not be saved in a Standard MIDI File.
•In the Event List panel/window, find the Insert Event Type menu, and select Patch Change.
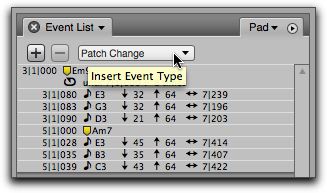
•With Patch Change selected in the Insert Event Type menu, click the Insert button--the plus sign (+)--to insert a Patch Change event in the Event List.
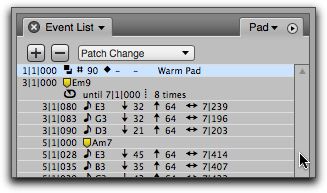
•In the location column of the resulting event, set the location to the start of the sequence (1/1/000).
•Click on the patch list menu to the right of the event, and select the same patch as in the Default Patch column for that track.
•With the location and patch selected properly, hit Return to place the patch event at the start of the sequence.
Don't hit Enter unless you want to enter additional patch events, which you don't.
•Now cycle thru each of your tracks placing patch change events on each one corresponding to the patch in their Default Patch column.
Note: if there are multiple tracks assigned to a single MIDI channel (for example, the drum tracks are all assigned to MIDI channel 10), you only have to assign a patch event to one of the tracks. Also notice that the tracks assigned to MIDI channel 10 have only a single patch selection available, 001 Standard Kit.
--SAVE A STANDARD MIDI FILE
Now we want to create the actual Standard MIDI File. We do this saving in a particular format. In some applications, this is done using an Export feature.
•Save your file.
•Go File > Save A Copy As... to open the Save A Copy window.
•In this window, locate to your project folder.
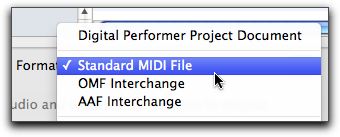
•From the format menu at the bottom of the window, choose Standard MIDI File.
•You can use the same file name if you like, but in any case, choose a file name without spaces followed by the extension .mid.
DP will add the extension for you. You may need to trim a previous extension from the name.
•Hit Save. In the resulting window (MIDI File Options) make sure you have selected Format 1 - separate tracks, then hit OK.
•Open your project folder and make sure you've properly creaed and saved a .mid file.
If you want to check your Standard MIDI File, open and play it in a MIDI-capable application. MIDI-capable applications installed on the Music Lab computers would include Garageband, Finale, Digital Performer, and Quicktime version 7.
--TURN IN YOUR WORK
•MIDI APPLICATIONS: Education: Post your MIDI file (extension .mid) to your website. On your assignments.html page, create a link to the file called "Chords Project."
•MIDI APPLICATIONS: Composition: Since MIDI playback is broken in some newer browsers, feel free to upload your MIDI file MIDI file (extension .mid) to the course dropbox, see course site for instructions.
•MIDI APPLICATIONS: Jazz: If you complete the website assignment, post your MIDI file (extension .mid) to your website. On your assignments.html page, create a link to the file called "Chords Project." Alternately, you may elect to turn in the entire Digital Performer Project to the course dropbox, see course site for instructions. Make sure you include your name in the DP project folder name.
•MIDI MUSIC MAKING & INTRO TO MUSIC TECHNOLOGY: Submit the project folder containing the Digital Performer file and the MIDI file to the DropItToMe Drop Box. See your course site for instructions.
LINFIELD: Post your MIDI file (extension .mid) to your website. On your assignments.html page, create a link to the file called "Chords Project."