GEOG 490/590: GIS Programming
Lab3. Sorting & File I/O
Due Feb 11 before class.
Introduction:
Lab 3 has two parts. In the first part you will
continue taking Modules 5 and 6 of the “Learning Visual Basic for
Applications for New ArcGIS Developers” course on ESRI Virtual Campus. The second part of the
exercise involve using the GxDialog ArcObjects coclass and the QuickSort subroutine to create a tool that sorts a list of
numbers in an input file and write the result to an output file.
Make sure you put your lab data in a folder in the
C:\Users folder and regularly back up your data to your H drive or portable
device. Click here to down the files needed for the
second part of the exercise. You will need to unzip the files after download.
The Lab3.zip file contains for files:
Notepad.gif
Openfile.gif
QSort.txt
Lab3_input.txt
Now you can start your online course (http://training.esri.com). Make sure you
experiment with the programming instructions in ArcMap
while reading the online document.
Sorting Tool:
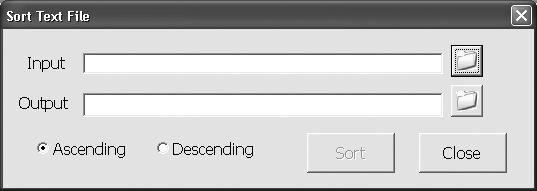
After finishing the online modules, you will design and develop a simple AP that allows a user to select an input file containing a list of random integer numbers and sort the list of numbers to an output ASCII file specified by the user. A sample layout of the UserForm of the AP is shown in Figure 1. The form should have:
l two textboxes for showing the specified file paths and names,
l two command buttons for selecting input and output files,
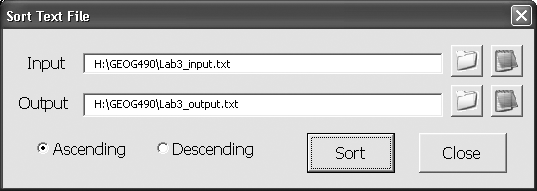
l two command buttons for viewing the input and output files (Figure 2),
l two radio buttons (aka, option buttons) for specifying sorting order (i.e., descending or ascending),
l one command button to execute the sorting, and
l one command button to end the AP.
Picture
Command Buttons:
The command buttons for selecting and viewing the input and output files
will use pictures on the button face. You need to prepare an image file (e.g.,
gif or jpg) and put the image file to the “Picture” property. Use
the openfile.gif file as the picture for the file
selection buttons. Use the notepad.gif file as the
picture for the file viewing command buttons (Figure_2).
You will need to set the “Caption” property of those command
buttons to “” (i.e., empty strings) to remove the captions. All
these steps can be done in VBA IDE, without writing any code.
Enabled and
Visible Properties of Controls:
It’s clear that a user cannot
view the contents of a file before the file name has being selected. Also, only
when both input and output files have being selected can the sorting tool does
the sorting. We should use the Visible and Enabled properties of command button
controls to guide the sequence of using the sorting tool. If you set the
Visible (or Enabled) properties to “FALSE” in VBA IDE, then these
controls are invisible (or disabled) when the program is executed. You can
change the values of these properties during run-time as well. This can only be
done through VB code, for example,
IF Len(Trim(txtInput.text)) > 0
THEN cmbViewInput.Visible = True
GxDialog coclass:
Please refer to Week4’s
lecture notes for sample code.
Option (Radio)
Buttons:
You will provide the options of sorting ascendingly
or descendingly in the sorting tool. This can be done
through a set of option button. When the “Value” property of an
option button is True, then the option button is
checked (or, if you check an option button, then its Value property is set to
True.) Only one option button can be checked in a group of option buttons. VB
controls such a mechanism for you, so you don’t have to worry about
setting the values of other option buttons when one is checked. If you have
more than one option categories, then you should use a “Frame” control
to group the option buttons into categories.
Shell
Function:
You can use the Shell function to run an executable program. Please use the
online help to see what the function’s return values are. You will write
a VB procedure to view the input (or output) file using the notepad.exe
program. Here is an example of how this is done:
Dim commandstr As String, ReturnCode
commandstr = “Notepad.exe
” & txtInput.text ‘note that there is a space after
.exe
ReturnCode = Shell( commandstr, vbNormalFocus)
vbNormalFocus is a constant that controls the
behavior of window style so that, in this case, notepad window becomes the
active window with a normal size.
Input, Outpur File Format and File I/O:
The input (i.e., Lab3_input.txt) and
output (whatever name you specify) are both in ASCII format. That means you can
use notepad to see their contents. The input file has a list of random integer
number, each separated by a newline character. The output should include a list
of sorted numbers and their original line numbers in the input file, delimited
by commas.
If you plan to use dynamic arrays,
which is preferred, be sure to count the number of lines in the input first.
This can be done by using the EOF() function and a
simple Do While loop. Here is an example:
LineNo = 0
Do
While Not EOF(infile)
Input
#infile, LineString
If
Len(Trim(LineString)) > 0
Then LineNo = LineNo + 1
Close
#infile
ReDim inputArr( 1 to LineNo)
ReDim LineNumberArr(1 to LineNo)
Please refer to the lecture notes on the functions to open, read, write,
and close the files.
QuickSort
Subroutine:
We will use the QuickSort algorithm that we
talked about in the lecture to do the sorting. The Qsort.txt file contains the
source code of the algorithm.
Public Sub QuickSort(keyarr()
As Long, dataarr() As Long, _
Optional ByVal numEls
As Variant, Optional ByVal descending As Variant)
Keyarr()
stores the numbers you want to sort. Dataarr() stores
the numbers that are associated with the numbers in Keyarr.
In this exercise, you will put the original line numbers in it, so when sorted,
you still know the original line numbers of each input integer number. numEls indicates how many elements in the input arrays are
sorted. In this exercise, we don’t provide any value for this argument so
the subroutine sorts every element in the input arrays. Descending determines
the sorting order. The default value is False, that is, the output numbers are
sorted ascendingly. If you want to do descending
sorting, then provide a True value to this argument. Here is an example of
calling this subroutine:
QuickSort InputArr, LineNumberArr, , optDescend.Value
Lab Deliverables:
Submit
the documents listed below in a zipped file.
1.
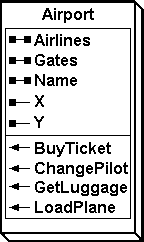
In ESRI online module
5 – Using custom classes, you created a class called Airport. Please
explain what its class diagram (Figure 3) means and
describe how these properties and methods were implemented in the Airport class
module.
2.
The pseudo-code of the
sorting AP. (Note: You don’t need to write
the pseudo-code for the quicksort subroutine.)
3.
Your mxd file that contains the following features:
1)
A UserForm
of the Sorting Tool (see the instructions above for the spec of the tool).
2)
An ArcMap
ToolBar called “Sorting Tools” containing
a button that when clicked brings up the Sorting Tool UserForm.
3)
Make sure your code is
properly commented.
4.
The output of your
sorting tool. Please use the Lab3_input.txt as the input file. The output file
should include the sorted integer numbers and their associated line numbers in
the input file.
Location of your lab file(s):
Computer Name: File Path &
Name:
.