suppressPackageStartupMessages(library(lessR))
style(suggest=FALSE)Quarto
Quarto is a general writing system that does text formatting and word processing, usually embedded within RStudio. With Quarto, a Microsoft Word document becomes output instead of input. Instead of running analyses such as an R and then copying and pasting output into a word processor such as Word, your text and analysis output are woven together and output as a single document. Quarto is the modern way of writing and doing data analysis where your analysis output goes directly to a webpage or to a Word document, intermixed with your writing.
NotePurpose
Following are some general instructions to combine writing and data analysis into a single Quarto document.
Many different forms of documents are supported such as individual manuscripts, books composed of chapters, web sites, slide presentations, and blogs. The template for this document is for a manuscript. To invoke the template provided by RStudio for any of these formats, go to the project menu at the extreme top right of the RStudio window and choose New Project.
Quarto documents are markdown text documents, editable by almost any app that edits words. Their file type is .qmd, for Quarto Markdown. The Quarto document includes these markdown instructions such as enclosing a word in asterisks to italicize it. This document is then processed to an output document such as a MS Word.
This template includes this .qmd document and the following folders and files shown in Figure 1, none of which are required to use Quarto except the the primary document, the .qmd document.

data folder: A convenient place to store data files, if needed.
image folder: A convenient place to store image files,
.pngor.jpg, if needed._quarto.yml: A
YAMLconfiguration file configures general aspects of the creative word processing documents. Retain as is, modify as desired, or delete entirely and use the RStudio default. Also, the beginning of this document includes three lines ofYAMLinstructions that could be added to the.ymlfile but may vary from document to document, so it is more convenient to display in each document file.style.css: A standard cascading style sheet file that formats webpages. This example adopts the formats for the posted web pages in my online courses. Retain as is, modify as desired, or delete entirely and use the RStudio default.
references.bib: References that can be cited in the written document.
Again, none of this structure is generally required to use Quarto but can be convenient. They also serve as examples from which you can build your own custom styling and file organization should you dive more into the technical details. However, you need not understand anything about the .yml or .css files to use Quarto, or even retain them. All you need to generate a Quarto manuscript is the document .qmd file.
Write Words
Write words as you would normally write. Style your writing from the self-explanatory menu bar in Visual mode as indicated at the beginning of the menu bar.
TipRendered document
When you want to view your document, click the Render button over the menu bar.
The result is the rendered document, an .html file if output to a web file or a .docx document if output to an MS Word document. Edit the .qmd version of your document to modify it, and read your web page or Word document as the finished product, at least for that editing stage.
The documents have embedded markdown codes, like asterisks around a word to italicize it, which you can view in Source mode, or have a standard word processing interface in the default Visual mode. Using Visual generates most or all of the underlying markdown instructions for you. However, if you wish to view the definitions of the markdown instructions, go to the RStudio Help menu and choose Markdown Quick Reference, or move over to Source mode to view them directly.
If all you are doing is writing words, then there is little more to learn. If you wish to have your rendered output, go to an MS Word document and change the html to docx in the format statement at the beginning of this document.
Write Code
We can embed code from R, Python, and other systems into what are called code chunks, here an R chunk, that will run when the document is rendered. Usually, begin with a code chunk that loads the needed packages. Here, access lessR, then set the lessR style() function to minimize text output by turning off suggestions.
The output will appear in our created document. The following accesses the data and generates text output. The file reference indicates an Excel file called employee.xlsx in the data folder that exists right next to this .qmd document in your computer’s file system (included as part of this template). You can verify this arrangement by clicking on the Files tab in the RStudio lower right window pane. There you will find a data folder, and clicking on that you will find the Excel data file.
d <- Read("data/employee.xlsx")[with the read.xlsx() function from Schauberger and Walker's openxlsx package]
Data Types
------------------------------------------------------------
character: Non-numeric data values
integer: Numeric data values, integers only
double: Numeric data values with decimal digits
------------------------------------------------------------
Variable Missing Unique
Name Type Values Values Values First and last values
------------------------------------------------------------------------------------------
1 Name character 37 0 37 Ritchie, Darnell ... Cassinelli, Anastis
2 Years integer 36 1 16 7 NA 7 ... 1 2 10
3 Gender character 37 0 2 M M W ... W W M
4 Dept character 36 1 5 ADMN SALE FINC ... MKTG SALE FINC
5 Salary double 37 0 37 53788.26 94494.58 ... 56508.32 57562.36
6 JobSat character 35 2 3 med low high ... high low high
7 Plan integer 37 0 3 1 1 2 ... 2 2 1
8 Pre integer 37 0 27 82 62 90 ... 83 59 80
9 Post integer 37 0 22 92 74 86 ... 90 71 87
------------------------------------------------------------------------------------------
For the column Name, each row of data is unique. Are these values
a unique ID for each row? To define as a row name, re-read the data file
with the following setting added to your Read() statement: row_names=1Here, create the data visualization in Figure 2, which is also destined for our output. In your text, reference the figure according to its label,as defined in the R code chunk, here fig-barchart. Reference by preceding the label with an @ sign in the text.
Chart(Dept)[Interactive chart from the Plotly R package (Sievert, 2020)] --- Dept ---
Missing Values: 0
ACCT ADMN FINC MKTG SALE Total
Frequencies: 5 6 4 6 15 36
Proportions: 0.139 0.167 0.111 0.167 0.417 1.000
Chi-squared test of null hypothesis of equal probabilities
Chisq = 10.944, df = 4, p-value = 0.027 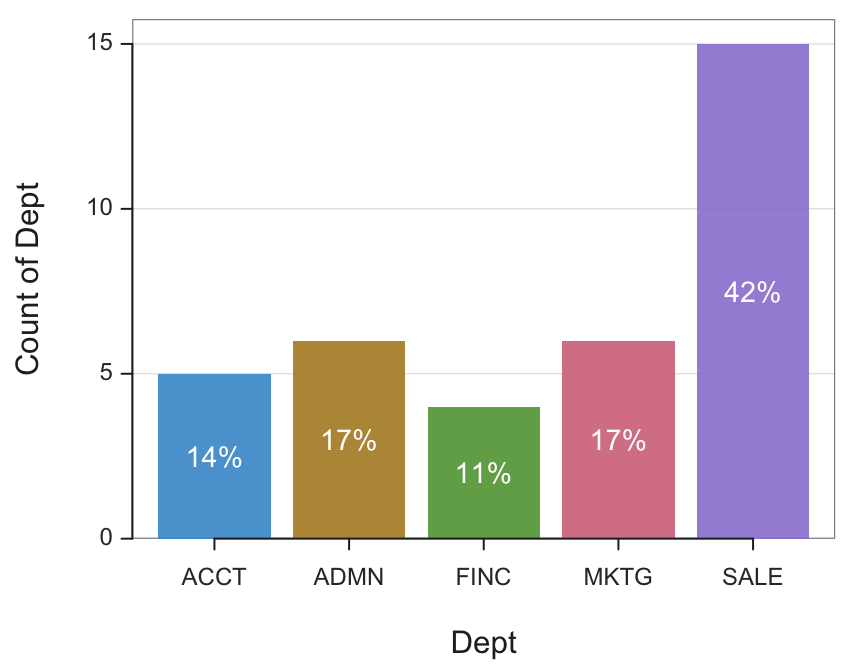
If you do not want your R (or whatever) code to display before the output, add the following line to the code chunk:
#| echo: FALSE.
View this instructions in both Visual and Source modes.
Embed Images
We can also embed arbitrary images in our document, as shown in Figure 3. Insert an image in two different places from the menu in Visual mode.

To cross reference the image as a formal figure, first name it. Name the image in the Attributes section of the create image dialogue window from inserting an image, shown in Figure 4. Display that dialogue window at any time by clicking on the image and then the three dots in the lower right hand corner.

Begin the name in the ID field with #fig- followed by a word of your choice without any spaces, for example, #fig-data. Then reference the figure in your writing with the same expression but replace the # with @, which you can also do from the Insert menu by choosing Cross Reference. In this example, the @fig-data in your writing references this figure, which then renders in this example as Figure 2.
The files included with his template include a folder called images, where the above image is located. Of course, if your document does not contain any embedded images, that folder could be ignored or removed.
Highlight Text
In Visual mode, go to the Insert menu, and towards the bottom, choose Callout…. That menu selection will generate the markdown to create a callout to emphasize some point.
NoteThis is an example note callout.
This is my highlighted text.
There are five types of callouts: note,warning,important,tip, andcaution. As always, if you wish to view the markdown instructions that create the callout, move from Visual mode to Source mode.
Cite References
Within the set of files that serve as the template for a Quarto document, find a file called references.bib. There are three references: a journal article, a book, and a manual. For your own papers, you can change the content as needed for your references. Follow the same structure for each type of reference. The only free choice is the name on the first line of each reference, which you decide and use as the key to reference in the document.
For example, the first line of the description of the journal article in references.bib is @article{GerbR,. The GerbR name is the key that could be whatever you want for your citations. To cite a reference in your document, precede that key with an @ sign, such as @GerbR. Following is a sample sentence to view how that citation appears in the rendered document such as: See Gerbing (2021) to learn more about lessR.
Gerbing, David. 2021. “Enhancement of the Command-Line Environment for Use in the Introductory Statistics Course and Beyond.” Journal of Statistics and Data Science Education 29 (3): 251–66. https://doi.org/10.1080/26939169.2021.1999871.
There are many, many options for the way that your rendered Quarto documents appear. The associated file included with this template, _quarto.yml, contains much of the configuration information. For example, this document lists each citation in the margins instead of at the end of the document. In that .yml file you will find the line: reference-location: margin, which does precisely what it says. Drop that line from the file so the citations appear at the end of your document by default instead of the margin.