G 424/524 GIS for the
Natural Sciences
D.
Percy
e-mail: percyd@pdx.edu
Projecting Coverages in ArcView 3.x
In Arcview 3.x the Projector Extension is a quick tool that you can use to reproject data that is within the same datum (use Projection Wizard or ArcMap to convert between datums, ie Nad27 to NAD83):
First check to see if it is already loaded:
A.
1. From the File menu choose Extensions.
2. Scroll down to see if Projector! is listed. It might be at the end of the list, instead of alpabetically listed.
3. If it is in the list, and it's not checked, check it. After you do this a new button appears in your View windows to right of all the other buttons. It looks like a North Arrow. Go to C.
4. If Projector! is not listed, then it needs to be added, go to part B.
B.
If you are on a computer on which you rights to move files anywhere do step 1. If you are in a computer lab where you can only write to the temp directory, do part 2.
1) copy the 3 files prjctr.* from the (assuming default installation...)
C:/esri/Av_gis30/arcview/samples/ext directory to the
C:/esri/Av_gis30/arcview/ext32 directory. COPY, don't MOVE. Hold down the Ctrl key while dragging files in order to copy them. Think of the "C" in Copy and Ctrl as a mnemonic device to help you remember this trick.
After you've done this, go back to A.
2a) Open the Control Panel, choose System, choose Environment. In the VARIABLE box type "USEREXT" (without the quotes!), in the VALUE box type C:\TEMP, click the Set button and you will see your new variable appear in the list.
2b) Copy the 3 files prjctr.* from the C:/esri/Av_gis30/arcview/samples/ext directory to the C:\temp directory. COPY, don't MOVE. Hold down the Ctrl key while dragging files in order to copy them. Think of the "C" in Copy and Ctrl as a mnemonic device to help you remember this trick.
After you've done this, go back to A.
C.
1. The map units must be set in order to project data. Go to view properties and make sure that they are set correctly.
2. Next, select the Theme that you wish to reproject, and click the Projector! button. The next 4 dialog boxes will ask for
Output Units
Projection Properties (If you are using Oregon GIS Service Center data you will need the Custom Projection info)
Whether to Recalculate
Whether to Add to a View
Notes:
You can only reproject shapefiles with this Projector tool.
Add your reprojected themes to a view in that projection! If you have multiple projected coverages in a view you won't be able to see them all (which is why you are reprojecting in the 1st place).
Add a little tag to the end of your filename to indicate what projection it is, like DD, UTM or SP. For example dunelines_SP.
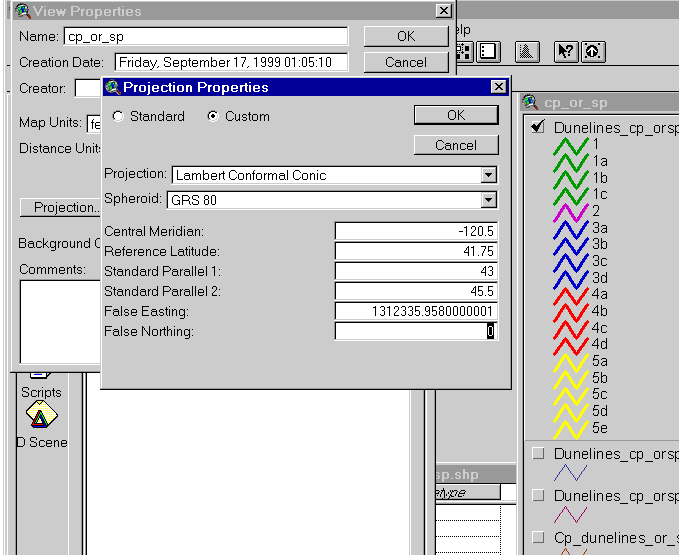
Custom Projection needed for Oregon GIS Service Center Projection
The Oregon GIS Service Center has developed a custom state plane projection that is good for the whole state, rather than splitting it into North and South. In order to get your data into this format (or out of it) you need to use the Custom radio button in the Projection dialog box.

Note: This screen was captured from a View Properties session. The Projection Properties dialog box will look the same when called from Projector! extension.
BIG NOTE:
You MUST hit the Tab key or somehow move to another input field after you put in the False Easting value!!!!!!!! If you don't, the value that you typed in doesn't really get put in, it remains 0. This has to do with the Event Model in Windows. When you start editting a field, it saves the old value until you exit the field (which calls an OnChange event). Most dialog boxes know about this and call the OnChange event before accepting values. This one doesn't. I'd call this a bug!! Regardless, be aware of it. The symptom that you'll notice is that your data plots at the correct Latitude, but it's shifted a whole bunch to the east.
Other Note
I eventually figured out how to make the State GIS projection part of my list of available projections! Here is a zipped copy of my Default.prj USE AT YOUR OWN RISK!!! Installation instructions: make a BACKUP COPY of your old default.prj, located under AV_GIS30/Arcview/Etc, I called mine default.prj_original. Now copy the new default.prj into that directory. If the new projection (called Oregon-goofy) doesn't show up, try restarting Arcview. I also changed the default UTM zone to 10, since that's where I live. You cane read about changing your default.prj in the online help of ArcView, but only edit the file yourself if you have confidence in what you're doing. And back it up first.
You can obviously only do this if you have write rights to the directory.