Operating Instructions for the Shimadzu AA-6300 Spectrophotometer
1. Before doing anything else, check the water level in the waste jug (on the floor, to the left of the instrument.) If it is more than half full, make sure that a spare waste jug is nearby. When the waste jug is ¾ full, change it! (Always treat waste carefully, even though the samples you are using are non-toxic. The instrument is used for other samples.)
Turning on the AA
2. Turn
on the computer, if necessary, and log in using your
3. The “Operation” tab should be highlighted. Click on the picture of the AA.
4. Enter “admin” for the user id and hit “ok”. (No password)
5. When the program opens, select the “Recent Templates” tab. Select “Expt 5 – AAAE.taa”.
6. In the toolbar at the top of the screen (see A in the figure below), select the element that you are starting with from the drop down list. (i.e., Ca, Mg, Fe, or Na)
7. Turn on the AA. (Power switch is on the front, lower right corner of the instrument.)
8. Click the “Connect/Send Parameters” button. The program will proceed through an initialization checklist. When the program asks if you would like to test the safety parameters, click “no” and then “ok”. (You will need to do this 3 times. We run though all of the safety checks once a week.)
9. A
screen entitled “Instrument Check List for Flame Analysis” will pop-up. Visually
inspect all items on the check-list, making sure to check them off. Turn on the
air line using the orange valve nearest the regulator, which should be set for
a pressure of 40 - 45psi. Open the tank valve on the top of the acetylene by
turning it one
and a half rotations. Acetylene
should have a tank pressure higher than 500kPa and a delivery pressure between
12 and 14psi. (If acetylene tank pressure is less than 500kPa, tell your TA
because we have to order another tank!) After
completing the checklist, click “ok”.
10. This will bring you back to the “Connect to Instrument/Send Parameters” screen. Click “next”.
11. This will bring you to the “Optics Parameters” screen. Click on the “Lamp ON” box to turn on the lamp. Then, hit “Next”.
12. The program will then tell you that a “Line Search/Beam Balance is necessary…” Click “ok”. This usually takes a few minutes. When the line search finishes, a spectrum will appear with a red line crossing at the maximum. If the red line is not at the maximum, run the line search again. When this finishes, hit “Close”.
13. You will now be taken to the “Atomizer/Gas Flow Rate Setup” screen.
14. Check to make sure that the burner is in the correct orientation (perpendicular or parallel). If not, rotate the burner. (Open the door in front of the flame and use the metal rod attached to the burner stem. Then close the door to avoid flame instabilities.)
15. Press and hold both buttons labeled “ignite” on the front panel of the AA. You will start to hear air flowing and after about 5 – 10 seconds the flame should ignite. The absorbance levels on the chart should increase after the flame is lit. If the burner has not ignited within 15 seconds, release buttons and close the valve on the acetylene tank. Press the purge button on the AA to drain the acetylene line. Wait a couple of minutes, then re-open the acetylene tank (1.5 rotations) and try igniting the burner again.
16. Make sure that you are on the “burner height/gas flow adjust” page. Verify that the burner height is optimized by moving it up and down a mm or two (using the computer control) while watching the signal. There is an automated height location procedure, if you prefer, but the manual method is quicker since we are near the right setting. Optimizing the gas flow settings is even more time-consuming and is usually not required.
17. Click “Finish”.
18. You are now ready to start collecting data.
Data Collection
1. The main screen of the WizAArd program looks like:
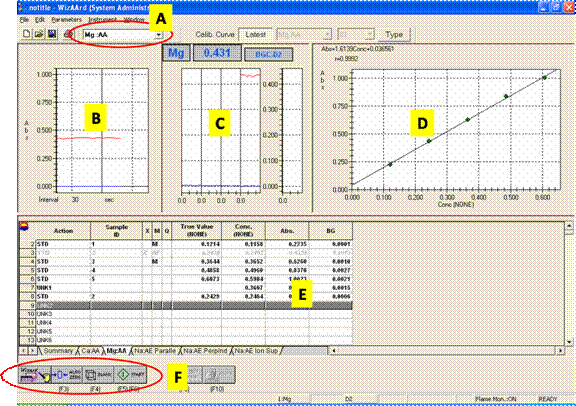
A: Element selector. Use this dropdown box to select which element you are working with. Whenever you change elements, you will have to do a line search/beam balance. (See # 12 above.)
B: Absorbance vs. time. This chart shows the absorbance/emission (red) and background (blue) signals that the instrument is recording in real time.
C: Absorbance vs. time. Unlike the previous window (B), this window will only be active when you are collecting data. It shows absorbance/emission (red) and background (blue). The boxes at the top of the pane show the element that you are currently working with, and the absorption that the instrument is measuring in real time.
D: Calibration curve. This shows a plot of your data (absorption or emission vs. concentration) for the standards that you have collected. It will update as you collect more calibration data.
E: Measurement Results Table
(MRT) This is
the data logger for the program and it functions like a spreadsheet with a
couple of quirks. The “Action” column specifies the action that the
spectrometer is going to take with that sample.
The columns labeled “Abs.”, and “BG” are the absorbance and background values measured by the instrument. (These will be replaced by an “E” for the AE experiments.) In the “Conc. (NONE)” column the program will output the calculated concentration of that sample (standard and unknown) based on the calibration curve. (If other columns are present, they are unimportant for this experiment.) The active sample is highlighted in dark grey (like line 9 in the figure above). This is the sample that will be collected the next time you hit start.
Note that after you collect
a piece of data, you are limited in what you can do. If you change the “Sample
ID” or “True Value” cell, an “M” will appear on the line showing the data has
been modified (like in rows 2 and 4 above.)
If you need to exclude a data point, double click on the “X” cell. (For
standards, this will remove them from the calibration curve. Like row 3
above.) The tabs at the bottom of the
spreadsheet allow you to flip between data sheets for the different elements. (You
won’t change the element you are testing by doing this, but you can at least
view the other data.)
F: Action buttons. You will use these to change elements (or you can use the drop-down box at the top A), auto zero, blank, and collect data.
2. Place the suction tube in DI water. Watch the Absorbance vs. time plot in the upper left corner of the screen. When the Abs level has stabilized, click on the “Auto Zero” button.
3. Place the suction tube in your “0” concentration (blank) standard. When the Abs level has stabilized, click the “blank” button.
4. Measure the absorbance of standards and unknowns according to the rows in the MRT. To do this, place the suction nozzle in one of the solutions and aspirate. Once the Abs level has stabilized, click on the “Start” button. The instrument will wait 5 seconds and then collect data for 5 seconds. The results will then be displayed in the MRT.
5. To turn off the instrument: Press the “Extinguish” button on the front of the instrument. Close the main tank valve on the acetylene tank. Purge the line of acetylene by pressing the “Purge” button. Close the orange air valve on the wall. Turn off the power to the AA. Exit out of the software.
Do not leave without closing the acetylene tank. Acetylene is
explosive and quite dangerous.
Other things you need to know:
Switching from Ca to Mg: When you finish the first set of AA measurements and change from Ca to Mg, go back to step 11 above – you need to do another line search/beam balance and re-optimize the burner height.
AE: click on the drop down bar at the top of the screen and select the sodium experiment that you are going to do (parallel, perpendicular or ionization suppressant). The “Optics Parameters” screen will pop up. We have the instrument set to automatically switch from AA to AE, so just click “Next”. You will hear some noise as the bulb is rotated out of position. The program will tell you that a “Line search/beam balance is necessary”. Aspirate your highest concentration sodium standard and run the line search as usual. The monochromator is now searching for the Na emission line from the flame. You can also do a burner height optimization before you start taking data.
To export data: Select: File > File Export. Then select which report you would like to export (i.e. Ca, Mg, Na). The AA program exports data as a text file, but it can be opened in Excel. When in Excel, data will open in the same order as it was in the AA program. Alternatively, you can open Excel and cut and paste data directly from the MRTs to Excel.
To turn the burner: Open the oven door and turn the burner using the arm.
To “zoom to fit” on a figure: Right click on a chart and select “radar”.