Musical Cue Sheet
Film Scoring & Finale Project
top instructions
Resources:
desc
You are asked to:
- For a film that you are scoring, create a tempo map in your DAW
- For the duration of your film, create a "click track" using a percussion sound
- Export your sequence as a Standard MIDI File (.mid)
- Import your MIDI file into a notation software project.
- Create a scoring cue sheet from your notation software file
- Save your file in PDF form, and submit
s1
•If you have not already, spot your film for musical and dramatic moments. Set locked markers to those spots.
Make sure all your markers are LOCKED, or the equivalent in your DAW. Locked markers stay in sync with picture even if the sequence tempo changes.
•In your DAW, investigate the way it controls tempo throughout the sequence.
•As you begin to envision the type of music you would create, set a basic tempo that works with that music content.
Monitor using your DAW's metronome track.
You could also create some minimal content like a drum track or chord hits.
•Now manipulate your tempo so that spotted markers land on or close to significant musical beats (e.g. downbeats).
s2
Now that you have tempo map that works with your film and catches important music moments, we need to create an actual MIDI click track.
•In your DAW, create a MIDI track assigned to a percussion instrument. Name it "Click."
•In the Click MIDI track, place a percussion sound (e.g. woodblock) on all quarter notes of your sequence.
s3
At this point we want to export from our DAW just the MIDI content of our sequence so we can open it in notation software. In other words we want to create a Standard MIDI File (SMF) with extension .mid.
•Make sure you save your sequence file.
•Investigate the way your DAW creates a SMF from its MIDI data.
You may do this by saving your file with a SMF format, or you may do this with an Export command.
•Create and save a SMF from your sequence.
This will save any play enable MIDI tracks, along with key, meter, and tempo information.
You might disable playback on tracks containing placeholder musical content. You only need the Click track enabled.
Check to make sure the resulting file has .mid for an extension.
s4
A Standard MIDI File can be opened (imported) in any MIDI-enabled software. This includes most DAWS, but it also includes most notation applications, including Finale, Sibelius, and Notion. These instructions focus on Finale in the lab, but the same can be done in a different notator if you like.
•On your lab Mac, open Finale.
•Click Open in the Launch Window, or go File > Open, and navigate to your .mid file and open it.
•In the Import MIDI File Options window, you can usually use the defaults, but take a look at the different thing that are available for import.
•Click OK in the Import MIDI File Options window. Your file will process and then open in Finale.
•IMPORTANT: Make sure to save your Finale file to your project folder at this point.
FYI, it's possible you might be able to use the notation feature of your DAW to do something like this (not for this assignment, tho). I still recommend your learn notation software for any number of reasons.
Some DAW's have an additional export method called MusicXML. This will send a more complete file to your notation software and can certainly be used in this type of situation.
s5
The purpose of this document is it allows you to create your music using a visual map. If you compose with pencil and paper, this is a must. Even if you work entirely in MIDI, this is a handy tool to keep track of your score.
•With your document open in Finale, go View > Scroll View to put your score into Scroll View.
This is a good way to see all your music left to right.
•Go Tools > Measure to engage the Measure Tool.
In the Main Tool Bar you will see a Measure item.
•Go Measure > Edit Measure Number Regions to open the Measure Number window.
•In the Measure Number Window, click as shown, then click OK--
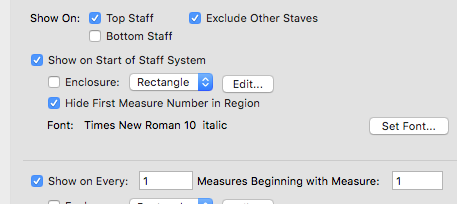
This will put measure numbers above each measure.
In this window you could reposition and/or resize the measure numbers if you wanted.
•Go Tools > Selection, then highlight any unused measures at the beginning of your cue. Hit Delete to remove them.
•Go Tools > Staff, then go Staff > New Blank Staves. In the New Stave window add 4 staves and hit OK.
You could add more or fewer staves depending on your work style.
•Go Plug-ins > Scoring and Arranging > Global Staff Attributes. In the resulting window, make sure all staves are highlighted, then deselect Display Rests in Empty Measures. Hit OK.
By default, Finale shows whole rests in empty measure, this defeats that.
•Go Tools > Page Layout.
Your document will switch to Page View.
•Go Page Layout > Systems > Edit Margins to open the Edit System Margins window.
•Enter values as shown--
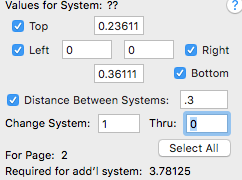
Notice the 0 value in the Thru: box.
•Go Tools > Selection, then go Edit > Select All to highlight all measures.
•Go Utilites > Fit Measures. In this window, Laock Layout with 4 Measures per System.
•Go Tools > Text. Double-click the bottom of the first page to create a text box.
•In the text box, type the title of your film. Then go Text > Inserts > Page Number to insert a page number.
•Go Shift-Command-T to open the Frame Attributes window and enter values as shown--
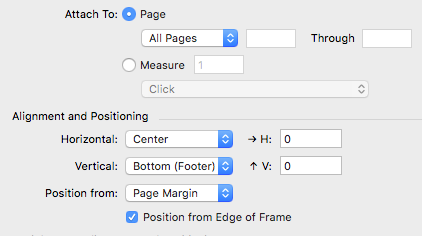
Using the Text Tool this ways attaches the text box to a spot on the page.
•Referring to your sequence, find the first marked spot, and note its measure.
•In your Finale document, engage the Text Tool and click above the same measure to create a text box.
•In the text box, identify the cue point.
This is probably the same text as the marker, but could have more content.
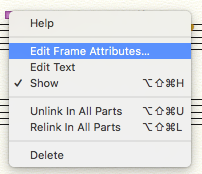
•Click outside the text box, then Control-click (right-click) its selector box to access its contextual menu--
•In the Frame Attributes window for this text box and enter values as shown--
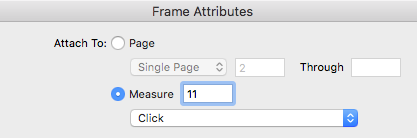
•Click OK, then drag the text box selector box to a position above the measure.
•Continue adding text boxes for all cues, then make sure to Save your score.
s6
At this point we would typically create a paper score to create music on. For this exercise, we'll create a PDF for class submission.
•With your score completed and saved, go File > Print.
Click Show Details if you get a small window.
•In the Print window, click the PDF menu in the lower left corner and select Save PDF. Navigate to your work folder and click Save.
•Submit the resulting file to the D2L Assignments folder for this project.