Triad Chart
Working with Notation Softward
top instructions
desc
1) Open a template in Finale
2) Enter triads in key of C
3) Copy triads to other measures and change key
4) Change text information
50 Submit to D2L
s1
This tutorial assumes you know how to download files from a browser, store and back up files on a lab Mac properly, and work with a MIDI keyboard on the lab Mac.
It also assumes you have completed the Finale tutorials provided by MakeMusic, and know how to make PDF files from the Finale Print function. See link above for that tutorial.
•From the link at the top, download and unzip the assignment files into a new project folder called Triad Chart Project.
In the folder, you should find a Finale (.musx) file and a PDF file.
•Open and examine the PDF file.
This is the way the finished file will look. We are creating a chart of the triads created in the major keys along with their chord symbols. Your finished work will look the same except for the copyright name at the bottom of the page.
•Now open the Finale template file.
As you begin the project, you will notice a good share of it has been laid out for you.
You may notice the locks at the right of each system--they prevent the system measure from updating. You can ignore them, they won't print.
At this point, you might choose to go File > Save As... and begin saving incremental versions of your work as discussed in class.
s2
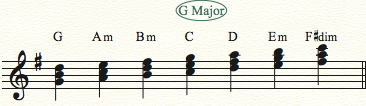
•Using whatever note entry method you like (e.g. Simple Enttry, Speedy Entry), enter the seven diatonic triads formed using the roots of the C major scale in root position.
Triads are 3-note chords. Diatonic triads are triads formed from a major (or minor scale), and in root position they are stacked in thirds.
When complete, your top system should look like this--

In general you wouldn't plan to keep things on a local drive in the music lab for a long time.•Double-click the Documents icon to open its Finder window.
As you enter these chords, if you are monitoring them, you may notice their quality (e.g. major, minor).
•Using the Finale Chord tool, place the appropriate chord symbol above each triad.
Chord symbols consist of a letter and a quality, either stated or implied. Triads formed from the major diatonic scale form 3 major, 3 minor, and 1 diminished triads.
There are several ways to enter chord symbols using the Chord tool, see Finale documentation if necessary.

s3
One of the great features of Finale, and something not all users are aware of, is its ability to selectively copy only certain elements of a score and exclude others.
We want to copy the notes and chord symbols from our first measure into the other measures. But we want to leave the labels above each measure intact.
Also notice that, whereas you can use copy-paste with Finale, that is often not the best was to accomplish that task. We prefer option-click, as below.
But first, let's filter out what we do and don't want to copy...
•In Finale, go Edit > Edit Filter to open the Edit Filter window.
•In the Edit Filter window, first click All to highlight all checkboxes.
•Now, under Marking, click Expressions: Dynamics, Expressive Text, Technique Text & Miscellaneous to de-select its box.
The labels above the measures are actually Expressions in Finale. We don't want to copy over them, so we are now removing them from our selection. Everything else can remain selected.
Click OK to close the window.
To copy and paste, we use the Selection tool. This is one of the most-used tools in Finale.
•In Finale, engage the Selection tool, then click in the first measure to highlight it.
Notice that when you click in the measure anywhere it highlights the whole measure.
Now, instead of Edit > Copy, do this this...
•Hold down the option key and click in the second measure.
The contents of measure 1 will copy into measure 2, except the label for measure 2 which is unaffected.
•Now, with measure 1 still highlighted, continue to option-click into the remaining measures so all contain the same content.
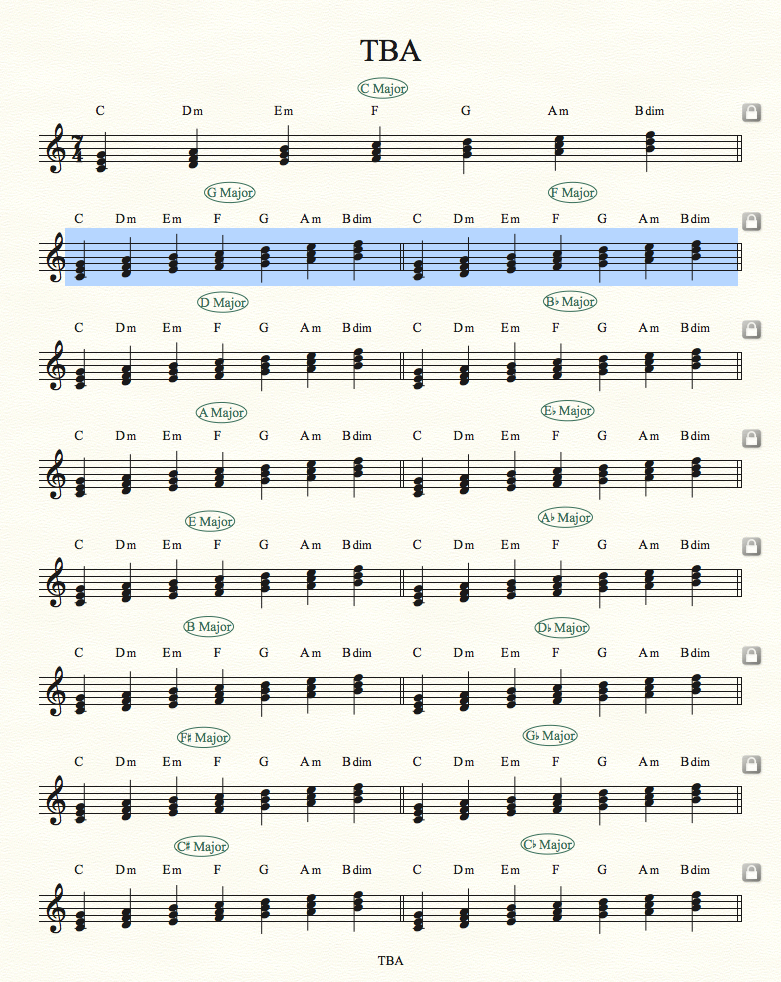
Now we want to do two things to each measure: 1) change its key signature, and 2) transpose its content to match the new key. Luckily, we do this both in one step...
•Engage the Key Signature tool, and double click the second measure to open the Key Signature window.
•In the Key Signature window, click Measure 2 Through 2, then at in the top section click the up pointer to add a sharp to the key signature.
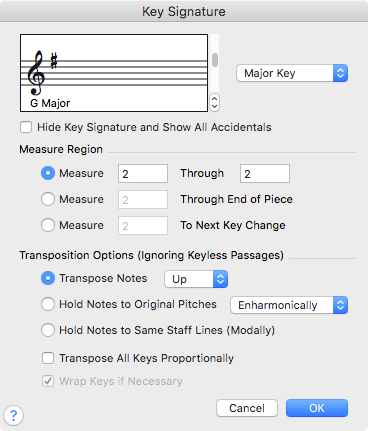
•Click OK to close the window.
The notes in measure 2 are now transposed to the new key signature placed at the start of the measure.
Notice that the chord symbols transpose, too.
•Now continue thru the remianing measures changing keys to correspond to the labels.
Compare the result to the finished version PDF. We have some cleaning up to do...
•In measures where the notes are not in the same octave as the finished version PDF, highlight the measure using the Selection tool, then hit the 8 key to lower notes by an octave.
Notice that there are key signatures, called cautionary key signatures, as the ends of the systems. We also want to remove the time signature at the beginning...
•Engage the Measure tool, then go Command-A to select all the measures.
•Double-click any measure to open the Measure Attributes window.
•In the Measure Attributes window, set Time Signature to Always Hide, and click Hide Cautionary Clefs, Key, and Time Signatures.
•Click OK to close the window.
s4
Now we just need to fix the text...
•Hit Command-K to open the ScoreManager window.
•In the ScoreManager window, click the File Info tab at the top, then replace the text in the title field with Triad Chart, and the text in the Copyright field with your name.
•Hit Command-K to close the ScoreManager window.
Your new text should now show up in the document.
s5
•Now use the instructions in the Finale tutorials assignment to create a PDF file of your finished chart.
•In the D2L site for this course, submit your PDF document to the Lab Assignment 8 (Week 9) folder.
In D2L, Assignment Submission folders can be found under Activities at the top of the course home page.