top instructions
Project Description
You are given a set of website template files and are asked to:
1) Download and configure template files
2) Open and edit a page in an HTML editor
3) Upload files to an Internet server
4) Check your new website online
5) Create a new page and link to it from your homepage
6) Link to an off-site page
7) Add graphics and media links to your page
Before You Begin
This tutorial assumes you are a registered PSU student with an active ODIN account.
ODIN is the name given by PSU Office of Information Technology (OIT) to their collection of servers where student web files are stored. Typically, if you have a pdx email account, you have an ODIN account and your user name is the part of your email address before the @ character.
This project employs two types of software: 1) an application that edits webpages called an HTML editor, and 2) an application that facilitates uploading files to an Internet server, called an FTP client.
On the computers in the lab we have these applications installed:
HTML Editor: BlueGriffon
FTP Client: Cyberduck
Website information for these two applications is posted at the top of the page. There are also links to some information provided by OIT about web pages and uploading to their server. You may notice OIT recommends the application Filezilla for uploading--you may consider that option if you are working at home or on a PC.
There are several other alternatives for HTML editing and FTP uploading, feel free to check online or discuss in class.
Note: If you are working in the music lab, make sure to store or back up your files on your H drive or an external drive. Data on the computers in the lab are removed periodically. H drive instructions are at the link at the top of the page.
Part 1: Download & Configure Template Files
First step is to download the zip file of the project files.
•At the top of this page, locate the link to the Project Files.
•Click this link to download the Project Files to your Downloads folder.
This will put a file called my_website.zip into your Downloads folder.
A zip file is a "data compressed" file that can be "un-zipped" into a folder or file.
•In the Finder, navigate to your Downloads folder.
When we say "in the Finder" we mean that the Mac application Finder is active. The Finder allows you to navigation, manage files, and access windows. You can activate the Finder by clicking on the blank Desktop. You can confirm that the Finder is active by checking at the left side of the top Main Menu--the currently active application will always show up there.
You can go directly to your Downloads folder by typing Shift-Command-H to open your Home folder, then double-clicking the Downloads folder.
•In the Downloads folder, find the new folder called my_website.
Usually when downloaded, the my_website.zip file should automatically de-compress into a normal folder called my_website. If you don't see the normal folder, double-click my_website.zip to de-compress it.
We will now refer to this folder, my_website, as your mirror folder. This folder will be a copy of your website, and where files are edited, prior to uploading to the website itself.
At this point, strategize on where to move your mirror folder.
The best plan, probably, is to keep your mirror folder in your H drive. You could also use a thumb drive or other external backup. You could keep the files on your local computer for a while, but in that case could not access them from anywhere else. Also data on the computers in the lab are removed periodically.
•Move your mirror folder to your H drive (or other location of your choice).
After moving the folder, you can rename it if you like.
•Open your mirror folder and check out the contents.
Notice that your mirror folder contains two item: a file called index.html and a folder labelled files.
What is the file index.html used for? Browsers, like Internet Explorer, Firefox, Opera, Mozilla, Chrome, or Safari, read files stored on a publicly accessible server. These files can be found using an Internet address called a Uniform Resource Locator (URL). A URL is a series of words that tell the browser what server to look for. A server could contain many different web pages. The words in the URL tell the server which folder (actually called a directory) it is looking for. The URL for your ODIN account website will look something like this: http://web.pdx.edu/~username/ This says "Go to the server at web.pdx.edu, and open up the folder (directory) where this user's website is stored." The character before the username is called a tilde. It's typed by holding the Shift key and hitting the letter above the Tab key. Notice that the browser has opened up a directory at this point, not a file. Now the browser looks for a file that it can understand, files that were created in a format called hypertext markup language, or HTML. These files will have an .html extension. There may be several different files inside your website directory that have that extension. When the browser first opens up your website directory, it looks for a file with this specific name: index.html. If it finds it, it opens it, and everybody's happy. That's why the file index.html is considered to be your "main" or "home" page. If the browser doesn't find a file named index.html, it will open the site in a ugly "table of contents" page. You don't want that. Later in this project, you will create an assignments page, and give it the name assignments.html. A browser would be able to find and open that page using this URL: http://web.pdx.edu/~username/assignments.html |
What is the folder 'files' used for? Once the browser has found your website, it can look for files in any folder available. For example, if you created an HTML file called gallery.html and put it into the folder called files, the browser could find and open this file using this URL: http://web.pdx.edu/~username/files/gallery.html Notice that a URL uses forward slashes / to show a folder hierarchy just like you would on your computer. The URL above says "Go to this user's website folder, then open a folder called files, then open a file called gallery.html." A browser can read files with the .html extensions, but it can deal with files that are in many other formats. In some cases, it uses files, e.g. picture files, within a webpage itself. In other cases, e.g. an audio file, it may open the file in a different application. These other applications, e.g. Quicktime, are called "helper applications" or "plug-ins." Other than the file index.html, you can create any structure of files and folders that suit they way your website is organized. |
Part 2: Edit an HTML Page
A browser can find and open files using the Internet--that's handy! In fact, you can use your ODIN account just to store files for yourself if you want.
However, Internet power comes from the concept of "links." Links let you change locations simply by clicking on a particular word or image.
When we set up our webpages, we will use links to let users navigate easily from one page to another.
Important Information On Uploading Currently, you are dealing with files that are located in your mirror folder. In a moment, you will upload these same files to the server where they can be publicly accessed. Once you upload your files, your website will consist of the folders and files on the ODIN server, not the files in your mirror folder. At that point, the files in your mirror folder are effectively a copy of your website. If we want to make a change to our site, we can edit the files in the mirror folder, but no change will occur to the website that the public sees until the new, edited files have been uploaded. |
Important Information on Links The HTML files that are in your ODIN website folder will have links in them. Some of these links are external (technically called "absolute"). For example, you could create a link that would open your course website. You can also create links to pages you have created and placed in your own website directory. These links are called internal (technically called "relative"). Internal links are relational--in other words, the browser will go look for them in a location that is relative to the current page. You won't have any problem linking to internal files as long as the browser can find the file in the location where it's told to look. But if that file is moved, or its name is changed (or it has never been uploaded), the browser will report an error. Here's what this means: once you have created an internal link to a file, you can't move the file or change its name. Or if you do move the file or change its name, you have to repair any link that points to that file. In other words, make sure the locations and links in the files in your mirror exactly match those on your server--if they don't you will have trouble. |
So let's open your new site in a browser locally...
•In your mirror folder, find the file index.html and drag its icon to the Safari icon in your Dock to open it.
You are now looking at the template file provided with this tutorial. You have opened this file in the browser Safari.
In the Safari window, look at the URL in the command line. The file:// part of it says that you have opened a file that is in your mirror folder, not on the Interent. Browsers can read any file with the .html extension wherever it is located.
But you may notice that just because you can look at it doesn't mean you can change it. To do that, you need to open the file in some sort of HTML editor.
Actually, HTML code can be edited in any simple text editor, but that requires specialized knowledge of HTML code. I recommend learning a little bit about HTML at some point, but for now the easiest thing is to use an What You See Is What You Get (WYSIWYG) editor.
There are several good HTML editors, most notably Adobe Dreamweaver, but they can be expensive. BlueGriffon is a free HTML editor which we will use for this project.
•To prevent confusion, in Safari, go File > Close Window to close the browser window that currently shows your template file.
•Click on the BlueGriffon icon in your Dock to open it.
If the icon is not in your Dock, open the Applications folder, and double click the BlueGriffon icon.
•In BlueGriffon, go File > Open File (or click the Open button).
•In the resulting window, click Browse and navigate to your mirror folder and select the file index.html.
•Click Open, then Open again to open the file in BlueGriffon.
You should now see the same page your just saw in Safari--the difference is that in BlueGriffon the data can be edited.
Our first step is to change the page's Properties...
•In BlueGriffon, go Format > Page Properties to open the Properties panel.
•Enter appropriate data in the boxes.
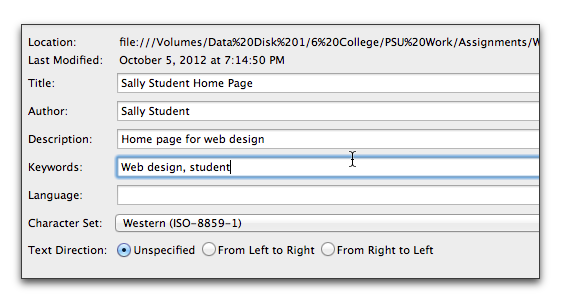
This information is what the users will see when they open the page or bookmark it.
•When finished, hit OK.
Now let's edit the page itself...
•On the top right of your template page, drag over the the text Text Here to highlight it.
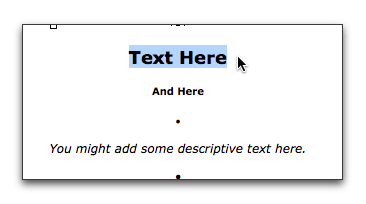
•Replace this text with your first and last name.
•Below it, replace the text And Here with some descriptive text about yourself, like a job title.
•Now select the italicized text below what you just typed, and replace it with a sentence that elaborates on the above, like "Contact me for web design" or something similar.
This homepage will effectively function as an advertisement for yourself.
•Scroll to the bottom of the page, and change name and date in the copyright information, also remove the brackets around this data.
•Go File > Save to save your edited homepage file.
•Go BlueGriffon > Quit BlueGriffon to quit BlueGriffon.
Part 3: Upload Files
Now that we have some things ready to post, our next step is to upload them to the ODIN server.
A server is simply a hard drive that is publicly accessible via the Internet. Any computer can function as a server, but more typically servers are maintained by larger entities called Internet Service Providers (ISP) that provide server space to individuals.
PSU has set up a server they call ODIN. The hard drives it use are provided by an account PSU has with Google. Inside this ODIN server, each PSU user has a directory (folder) assigned to their data. This directory can hold different types of items, including email and other storage; it can also contain website files.
When a user want to visit your site, they would enter the URL http://www.web.pdx.edu/~your_user_name. The browser would then use the URL to first find ODIN, then your specific directory.
Actually, there is one additional step that the user doesn't see. Your website files need to be contained in a folder titled public_html. In other words, when a user enters the URL above, it says "First find the ODIN server, then locate the directory assigned to your_user_name, then find a folder named public_html, then look inside and see if there is a file named index.html. If so, open it."
So our job at this point is to take the files from our local mirror folder and copy them into the public_hmtl folder within your PSU ODIN account directory. Simple, right?
Our first step is to employ an FTP Client called Cyberduck, installed on the lab Macs.
•On your computer, find the icon for Cyberduck in the Dock and click it to open the application (or open it from the Applications folder).
•Open Cyberduck, then go File > Open Connection or click the Open Connection button in the Cyberduck window.
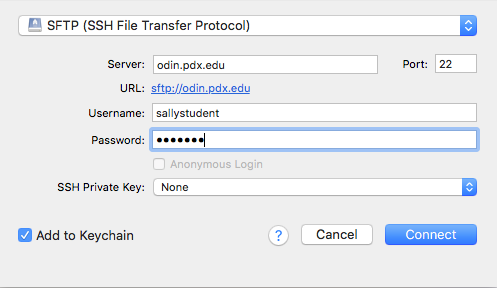
•In the resulting panel, set the top menu to SFTP (SSH File Transfer Protoco).
FTP is an older web technology that simply facilitates data transfer from one server to another. SFTP is FTP with an extra layer of security.
•Now input data into the remaining text boxes:
--Menu at top: SFTP (SSH File Transfer Protocol)
--Server: odin.pdx.edu
--Port: 22
--Username: your user name
--Password: your PSU ODIN password
Leave the bottom two menus in Default mode.
As you connect, you may get a warning dialogue. It's not a problem, just click Allow.
NOTE: See below if this method does not work...
If you have entered the data properly, you should connect to your server directory, and see the contents of your public_html folder. Here's what mine looks like--
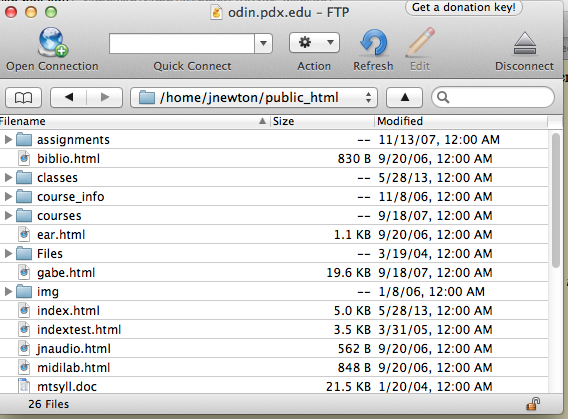
Notice how the top menu shows the path to my website directory, including the public_html directory.
BTW, if this is the first time you have connected at PSU, you may not have a public_html directory. In that case, once you have opened your account in Cyberduck, go Directories > Create New Directory to create a directory (folder). Name the directory public_html and hit OK. Now double click the public_html directory to open it as a Cyberduck window.
IMPORTANT NOTE:
Because of changes in PSU account management, you may need to connect this alternate way--
--Menu at top: SFTP (SSH File Transfer Protocol)
--Server: sftp.myfiles.pdx.edu
--Port: 22
--Username: your user name
--Password: your PSU ODIN password
If you get a dialogue about "Unkown fingerprint" click Allow.
When you connect in this manner, you will first see an overview of the three folders installed by PSU--
Hdrive-HomeFolder
Idrive-ResourcesFolder
UNIX-Web-Folder
Double-click the
UNIX-Web-Folder to locate inside it.
If you have a public_html folder, double-click it to open it. Your web files should be placed in this folder.
If you don't have a
public_html folder, in Cyberduck to to the File menu and New Folder. In the resulting window, enter public_html and create. Make sure you are in this new folder before uploading files.
For the next step, screen management is important. Make sure you are able to see your new Cyberduck window and also the contents of your mirror folder.
•Click in your mirror folder, then go Edit > Select All (Command-A) to highlight all of its contents.
•Drag the highlighted files from your mirror folder to the public_html folder in Cyberduck to "upload" them.
There may already be a file called index.html in the public_html folder in Cyberduck. Generally, if you are dragging a file that has the same name as a file currently in the directory, it will ask you if you want to Overwrite. Yes, you do, assuming you want it replaced with the file you are dragging.
•Check the contents of the public_html Cyberduck folder. It should look identical to your mirror folder, i.e. it should contain an index.html file and a files folder.
The number one mistake people make at this point is to drag the wrong files into public_html. Don't drag your mirror folder itself into this directory, drag its contents. The second most common mistake is to drag files into the wrong place in your ODIN account. Check the path as described above--your website files should be in /home/username/public_html to show up on the Internet.
If things appear properly in the Cyberduck window, proceed to the next step.
Part 4: Check Your Website Online
•First, close all open applications to prevent confusion.
•Now open Safari by clicking on its icon in the Dock.
For now make sure you are using Safari. You can (and should) check your site in other browsers, but let's start with the Mac-friendly browser for now.
•Once Safari has opened, type Command-L to select the command line.
•Type this URL (using your own ODIN user name) to access your website online:
http://www.web.pdx.edu/~your_user_name
•Click Return.
Your website should open in your browser.
If you are not seeing what you want to see, hit the Reload button in the right corner of the Safari command line.
Under some circumstances it may still not reload properly, and you may need to Quit and restart Safari or even empty the Safari cache. Ask your instructor for help if you have problems seeing the page you've uploaded.
Part 5: Create and Link a New Page
So now we've edited a web page and uploaded it. Our next step involves creating a new page and linking to it from our home page.
We could just create a new page from scratch and you are welcome to do that. However, it would be easier to just start with the page we've already uploaded, then make some changes.
•In the Finder, go to your mirror folder, find index.html and click it once to highlight it.
•Still in Finder, go File > Duplicate to create a copy of index.html.
•Rename the duplicated file assignments.html
Make sure you have name your new file correctly, with no spaces and the .html extension
•Open BlueGriffon, then go File > Open File. Navigate to your mirror folder and open assignments.html for editing
•Go Format > Page Properties and customize data.
•Save your new page and close your BlueGriffon edit window.
Now we want to create a link to this new page on our original home page.
•If you haven't already, open BlueGriffon.
•In BlueGriffon, go File > Open File. Navigate to your mirror folder and open index.html for editing.
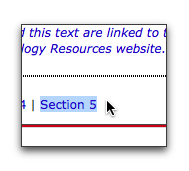
•In the line of text below your header information, find and select the phrase Section 5. Change the phrase to Links.
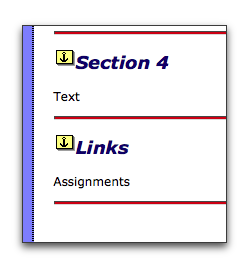
•Lower on the page, find the bold face phrase Section 5 and change it to say Links.
•Below that, find the phrase Text. Select it and change it to Assignments.
•Select this word Assignments. Go Insert > Link to open the link box.
•In the resulting pane, in the top text box, type My Assignments Page
•In the Target box, type assignments.html
Type carefully, as this will show the link where to go to look for the page.
•In the resulting pane, highlight the Make URL relative to page location button.
This is a relative link, meaning a link to a page within your own domain folder. assignments.html is in the same folder as index.html, so no further path information is required.
•In the Title Box, type Assignments Page.

The only important piece of data here is the link itself. The other entries provide info in case the page doesn't load and so forth.
•Save and close your home page, upload both index.html and assignments.html to your website, and open your homepage in a browser.
•Click on your new link to check it--it should open your Assignments page.
Part 6: Link to a Remote Page
The previous link was made to a page contained in our own website domain. Now we want to create a link to a page on another server. This link will require the full web address.
•Open BlueGriffon and then open your homepage for editing.
•Scroll to the bottom of the page and enter a new text line below the Assignments text. The new text should read Course Website.
•Drag over the new text to highlight it, then go Insert > Link to open the Link panel.
•In the Link window, enter the URL for your course in the Target text box.
You can just type in this information, which can be found on the course syllabus.
However, it's always better to copy and paste data like this instead of trying to type it in. The easiest way is to go to this site in a browser, and select and copy the URL from the command line.
In any case, make you've pasted the whole URL is in the Target text box, starting with http://
•Save and close your home page, upload it to your website, and open it in a browser.
•Click on your new link to check it--it should open your course website page.
Part 7: Add Graphics and Media Links
Now that we have a working site, let's start working with media: images and audio
•Open BlueGriffon, then open your index.html page for editing.
•Place your cursor beneath the text at the top left of your page.
You can choose to place a graphic in a different spot, and you are free to use a different image if you like.
•Go Insert > Image.
•In the resulting panel, click the Select Image icon to the right of the Image Location text box.
•In the resulting window, navigate to your mirror folder, then open the files folder and select modularmoog.gif.
•Click Open to return to the Select Image panel.
•Highlight the Make URL relative to page location button.
Notice that this changes the text in the Image Location box. It should read simply files/modularmoog.gif
•Input some text into the next two text boxes.
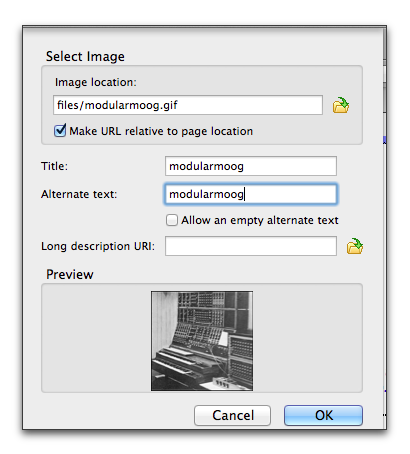
•Click OK and inspect the graphic in your page.
•Resize your image by dragging its various control points.
•Save and close your home page, upload it to your website, and open it in a browser.
Your graphic should now appear in your homepage.
Using a Different Image When you upoaded your index.html page and checked it in a browser, you should see the modularmoog.gif image. This is because 1) you created a relative link on your page that says "in the current directory, find and open the files folder, then find a file called modularmoog.gif and open it in this spot on the page, and 2) on the server, there already is a files folder that contains modularmoog.gif. This was uploaded when you first posted your page. You are welcome and encouraged to place your own images on your pages. When you do, follow this procedure-- 1) Place the image (or a copy of the image) in the files folder within your mirror. Make sure you are uploading the image into the files folder in your website. The image must be in the same relative spot as the link says it is. Common mistakes include llinking to a file that is not in your mirror folder, forgetting to upload the image, or uploading the image to the wrong place on the server. Avoid these if you can. |
Now we want to add an audio link to our page.
•Open BlueGriffon, then open your index.html page for editing.
•At the bottom of the page, locate your cursor to the section below the Assignments page link, then type the words Bang Drum.
•Highlight the words Bang Drum, then go Insert > Link to open the link panel.
•Create a relative link to bangdrum.mp3 inside the files folder.
The link should read files/bangdrum.mp3
•Save and close your home page, upload it to your website, and open it in a browser.
•Click on the new link. It should "stream" audio in a new window.
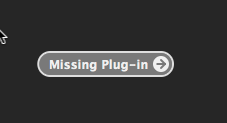
Streaming Audio When you click on the audio link on your page, your browser should switch to a different page, then start playing your file in a small player image. This process is called streaming. To play these files, the browser opens a helper application (e.g. Quicktime) and begins downloading the content. Because the files may be large, the helper application doesn't necessarily wait for the whole file to download, it just downloads enough so that the media playback doesn't have to stop and wait mid-stream. You may notice that your mirror files folder contains a file called jamaica.mid. This is called a Standard MIDI file (SMF). We used to be able to stream midi files in browsers. As it happens, newer browsers have trouble playing MIDI files. In their wisdom, for example, Apple decided that the new version of Quicktime won't support MIDI. This was done to coordinate with mobile devices that don't handle MIDI as well. This is a real problem that many are complaining about, but it is the reality. If you happend to create a link to a MIDI file on your page, when you click your MIDI link, you may get this message--
|
Part 8: Get Credit for Your Work
Check below to register your site for credit in your class.
MIDI APPLICATIONS: Education: Provide your ODIN user name to your instructor on a sign up sheet in class.
MIDI APPLICATIONS: Composition: Provide your ODIN user name to your instructor on a sign up sheet in class.
MIDI APPLICATIONS: Jazz: Provide your ODIN user name to your instructor on a sign up sheet in class.
INTRO TO MUSIC TECHNOLOGY: Send an email to your instructor with your ODIN user name.
MODERN MUSIC TECHNOLOGY: Send an email to your instructor with your ODIN user name.